Thanks for the tips Ed. I'm hesitant to mess with the fillets by heating them. Is this detrimental to the fillets at all? I've already taped the seem and epoxied the inside. If it is unlikely to affect the performance I don't think I want to mess with it much.
-- jaydillyo
P.S. Where in NY are you located? I'm in Rochester.
I'm just outside of NYC, in Westchester so not much help there. It is hard to tell how much twist is actually there verses the angle of the photo. The other option I can think of would be to actually run a saw blade down the center line of the bow cutting right through the fillet, glass, etc. Then fix the twist and epoxy it back together. Since you do an end pour later I do not think final strength would be a factor.
It seams like a lot to mess up what work you have already done. I guess it's balancing how much twist there is and how much that will bother you down the line against the extra work now. It is easier to fix now than later.
Perhaps some other builders can weigh in on this one.
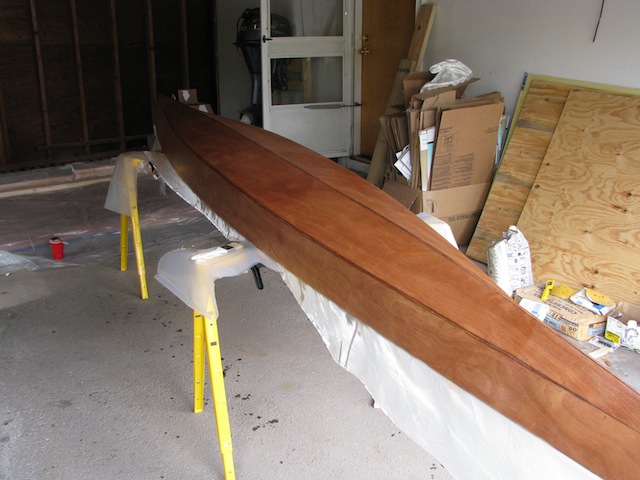
I'm ashamed to say that it's been a long time since I worked on the kayak, but I'm finally back at it. I moved it up into my garage for sanding. I didn't want to do the sanding indoors, even in my basement, so I was waiting for better weather.
I'm not quite sure if I have rounded the chines enough. It's hard to tell. I plan on glassing the bottom on Saturday as we have 70 degree weather in the forecast.
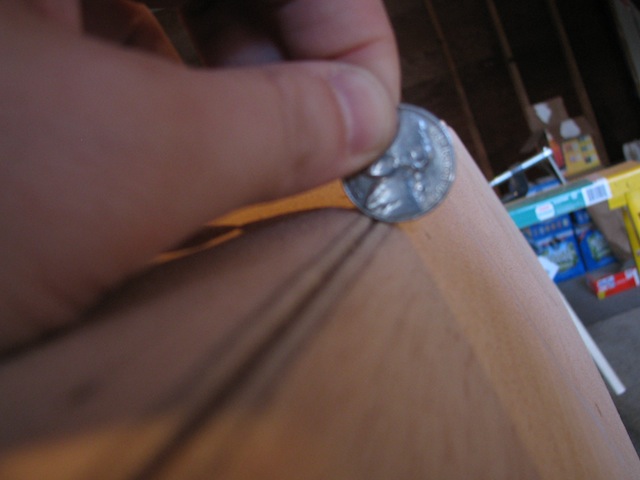
Here's a picture of what the chines look like right now. I'm not sure if I need to hit them a bit more or not... Might be hard to see in the picture.
Jay, they look good to me. My edges were rounded, but more like a 1/4" than the radius of a nickel. Just use patience when pulling your squeegee over the glass as you wet it out. Maintain firm contact with the boat as you transition from hull bottom to sides; that'll keep the cloth down hard on the wood (vice popping up over that seam).
Again, from what I can see you did a great job rounding over - very even along the entire edge.
Today I sanded the whole thing in preparation of glassing the bottom. After I got done sanding I filled in the crack along the chine and the bottom.
The video didn't mention to do this until after sanding. A post on the forums mentioned to do it before sanding. I think it makes more sense to do it first, but I think mine will turn out ok regardless. I taped along the edges and filled the cracks, then I went over it with a squeegee.
Tomorrow I'm going to have to sand the chine and bottom again, but I'll use 220 grit just to be sure I don't take too much off.
Don't-cha just LOVE sanding??? I'm sanding the primer on the bottom of my hull..., that and the epoxy micro-balloon mix I used to fair in a few rough spots. It seems like I've sanded this hull about 6 times, and this weekend I'll put two more coats of primer on, which will also have to be sanded (almost completely off)! I just wish I were into the painting phase... already!
Today I trimmed off the fiberglass and rolled on the 2nd coat of epoxy. I'm rolling it on pretty thing so it's going to take several coats to get the weave to disappear.
My goal is to have this kayak ready for varnishing by May 20th. My parents are visiting and I want my dad to help out with the varnishing as this is a christmas gift from us to my mother.
I'm hoping to have my paint and varnish on about the same time..., the primer's on but I'm still unhappy with the front end... too many bumps/dips/wrinkles. Might put more epoxy fairing mix on it and resand (oh how I hate sanding these days!!!).
Be sure to continue posting pics; it looks excellent.
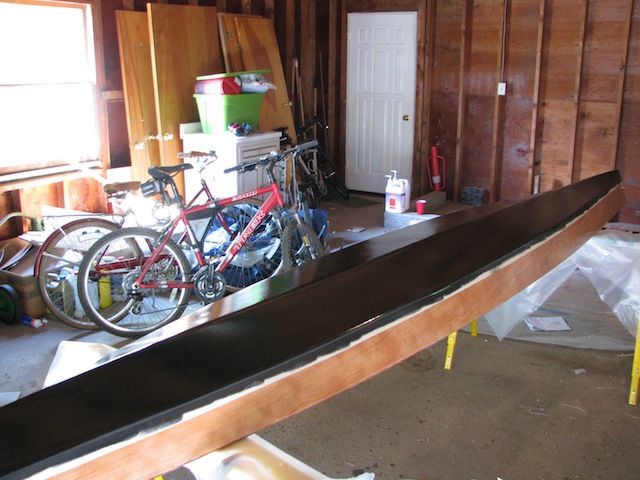
Finally some decent weather! The weather has not been cooperating with the kayak build at all. Today I put the first coat of graphite on the bottom. It's pretty ridiculous how the black shiny surface makes the flaws so prominent. I hopeful that after the 2nd coat and some sanding it will look better...at least that's the theory.
Seriously, if you're talking about planing the sheer clamps, that should take well under an hour. If your plane is properly sharpened, it should glide through the wood and your problem should be how to slow it down. You might want to take a break and sharpen that blade.
Unless you plane is a Lie-Nielsen brand new doesn't mean it's sharp. The LN planes are the only ones I've ever used that didn't need to be tuned up a bit before use. Stanley, Anant and others are going to require putting the iron to a stone if you want good, sharp planes. Doesn't take that long and makes a world of difference in performance.
You can find sharpening instructions right here on this web site. Go to Shop Tips/Stich & Glue/Sharpening Tools. If you do not have a good eye like me, you can order a Veritas Mk.ii Honing Guide which holds the iron at the right angloe. I also had some instrctions from the net, but cannot find them at the moment. The recomended progressively finer grades of sand paper, ending with like 2000 layed on a sheet of glass. that works very well.
Get that dude sharp and you will be amazed at the difference.
Alright. Well the deck is on. I had several screw ups along the way. First of all, I ended up doing it in 2 parts, so I couldn’t overlap the halves to properly cut the pieces to butt right up next to each other. I cut them the best I could which left a small gap that I just filled with thickened epoxy.
The second is that some of the nails I put in came through the sheer into the boat. I should have checked them sooner to make sure this wasn’t happening. The mistake I made was that I angled the nails to be perpendicular with the deck instead of at the same angle as the sheer. So, now I have some nails sticking out into the cockpit. I’m just going to have to put a couple layers of epoxy over them so it is waterproofed and they aren’t sharp.