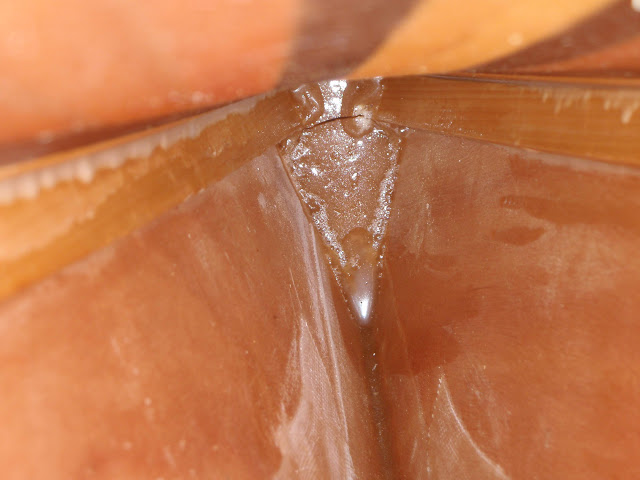
All the way home today I'm watching water drip out of the hole drilled in the bow end pour for my grab handle. I'm thinking wtf? I must not have sealed the hole with enough epoxy.
My next move is to set the boat on end and fill it the forward compartment with water and see where it comes out. I think I may have to sand the hole clean, fill it with epoxy and try again. Updates later...
Dan, I opted against the hole for the grab handle (mostly because I wasn't sure I could get it to go straight through, and didn't want to put a large mistake on either end of the boat). I may opt for four bungee loops (two per side) at the front, do an X-cross with some line and leave enough hanging out front for my handle.
All that said, your solution sounds sound... I hope you get it plugged up.
At second glance this afternoon it looks like the end pour was not solid (it got hot and bubbled). It looks like I may have drilled thru a bubble and that bubble may lead into the front compartment which did have some water in it. Saturday was the first time I had paddled thru any swells so I hadn't noticed this before. I still think the solution will be to turn the boat on it's side, fill the hole with unthickened epoxy and redrill. Not a major problem, I hope...Lesson learned....stick the end in a bucket of ice water when doing an end pour.
You are a rarity because you built your own boat! Soon you will be among a not very elite group of boatbuilders who know how to fix problems with epoxy. Fix that puppy and get back out on the water. Nobody will know.
Put a layer or two of tape on the bottomside of the hole, pushed up unto the hole a bit, before you pour in anything. Reinforce it so your goop mix won't pop out the bottom. Might reduce the need to refinish, hopefully. Good luck.
Thinking out loud, have you found the leak? If you put a brush on the end of a stick and used it and a solvent through the hatch to clean the face of the end pour, some of it might seep to your bow hole. Let it dry out, then pour a small amount of unthickened epoxy in to follow the same path as the solvent. If the epoxy will flow through, plug the bow's rope hole with an inflated balloon or plastic covered dowel after an initial cleanup (minimize later varnish repair) of the seepage. That might seal the leak from the inside. You'll have to protect the tip of the bow while your yak is standing on end. The seepage path is probably not regular. Any epoxy filling that path could lock in and make a nice seal. Might be easier than trying to push the epoxy in from the bow hole. Also, about the time the epoxy is starting to gel (check the left over in your mixing cup) you could go in and clean up any excess pooling at the bow with paper towels on the end of your stick (just don't pull out your new plug). Again, good luck. Glad to hear you are still paddling.
If it's cool where you are working, you could warm the epoxy (hot water) to make it a bit more runny. You don't need a lot of working time, just enough to let the epoxy find the leak. Use a slow hardner. If worried about how hot, etc., make a small test batch (or more) and use it on a fabricated leak. Let us know whatever you try.
It seems like this issue might be another reason to consider filling the ends with thickened epoxy before the deck goes on. I made little temporary dams early on, and then deposited all the excess epoxy from other operations in the cavities as I went along. When they were finally full, I could verify that the ends were well sealed, and I could clearly see where it was safe to drill the thru-holes for the toggle handles.
I did the end pour with silica thickened epoxy. After allowing it to fully cure I carefully drilled through the exterior wood, epoxy, and out the other side, but not completely, just enough to make the exit mark. Then I finished by drilling from the other side into the already drilled hole. This way you won't make a mess of the exit hole which can tend to rip the wood as the bit exits. Then I used a piece of black, solid irrigation pipe that you can get at Home Depot or Lowes. I can't remember the exact diameter, but I think it is 3/8". Regardless it is almost the exact diameter of the drilled hole (using a flat wood bit, again I think 3/8") Once your hole is drilled, you put some epoxy on the outside of the pipe and with a little effort push it into the drilled hole. After cured, you simply sand the black plastic pipe flush with the wood. This leaves a very clean and good looking conduit through the boat for the carry handles. If you are careful, it looks good from both sides. You can test the method on some scrap wood before attempting on the boat.
Just and idea you might use.
I have some pictures but I can't figure out how to attach...
This won’t help Dan, but he read it before building his boat and chose to follow the kit instructions instead. I have long thought it crazy to dump half a pound of useless epoxy into the ends of my boat and then drill a hole through the hull for a carry rope. It just seems too crude for a project that takes so much time and effort to build. Instead, I attach lifting toggles to small nylon fairleads, which I attach to the deck with inch-long screws after I varnish the boat. Then I prop one end of the boat upside down on a stepladder and set the other end on a piece of styrofoam on the floor. I then pour about three ounces of lightly thickened epoxy into each end, which encases the screws and secures the lifting toggles while reinforcing the most vulnerable part of the bow or stern. You can see photos of the process and results on my Shearwater page at www.twofootartist.com - Wes
I thought one of the points to the end pour was to form a solid plug sealing the bow to deck. I don't see how it would be solid if done before the deck is glued down. I'm wondering if several small, cooler, pours might be better.
I like the idea of finding the leak path with solvent. Any preferences? 333, rubbing alcohol?
Unfortunately it's raining here and it might be hard to find a place to stand the boat up inside as it's taller than my house...this is how I did the end pour
I don't think it is wise to sell the end pours short. They can be a life saver as I will explain in a moment. I do fully agree that oversized end pours are a lot of extra weight and should be avoided. Similarly, if you can get a good fit with a carved black and bed it well in epoxy, that's great. We are talking about an area that is quite difficult to get at and to make up a good joint, and, it is an area that is suseptable to damage from collisions with any number of things including docks, sand, roack, and other boats. It pays to make sure the area is strong. Enter my story which I have told here before:
I carry my Mill Creek 16.5 rightside up, on top of my SUV. I load it by setting the bow on the rear of the car with the stern on the ground. I then just pick up the stern and slide the boat forward onto the racks. One day I got in a hurry and gave the boat a mighty shove. There was a strong cross wind and before I could stop it, the boat headed for one side of the car. I stood there hold the stern over my head as the boat came off the side of the racks, dropping the bow to the ground. That was a 6 ft drop onto essentially concrete. Every ounce of end pour earned its keep that day as the boat survived without a scratch (helped also by a carbon and dynel rub strip). Had I not had a good end pour, I am convinced the boat would have split like a ripe watermellon.
Let me also throw in: I installed my end pours in both my MC and my Shearwater 17 H before the decks went on. By building up the pour (which was added a little at a time after one vesuvius like experience) it was easy to match the top of the pour to the deck camber guide which made a good surface to epoxy the decks in place. No problems and both boats by the way have holes drilled for carry toggles.
Paul, I recall reading your story before and found it a real eye-opener. I should have also mentioned that I put in a deep fillet in both ends - about 1-1/2" deep, and wrap the seam tape around this fillet so it effectively has three layers of nine-ounce cloth on the inside, in addition to three layers of four-ounce cloth on the outside. I suspect this is lighter, stronger and more flexible in the case of impact than a solid end pour. -Wes
FWIW, I used my extra epoxy for my end pours during the build, with a damn on each end (they leaked at first, but eventually I got that fixed). When I put the decks on, I slathered on thickened epoxy along the sheer clamps and then poured the remaining epoxy on top of the bow/stern pours, bringing the level proud of the sides (easy to do as the boat is essentially flat here). The deck pushed out the excess epoxy, giving me what I'm sure is a completely filled front and back void.
That said, I didn't drill through either for pull ropes, opting instead for a deck-mounted arrangement leading up to a short pull rope/handle. Just couldn't bring myself to drill that big of a hole through either end of my boat!
Will have pics shortly, as my varnish is going on this week...; then it's on to deck rigging!