Keep the updates coming. My next project is likely a Panthera 2 lightly build so that it is easy to laod on my truck. I might use Paulownia for the hull.
ok....so it's finally getting warm and today i started cleaning up the garage and re-arranging things so i can start my build. it's a pretty small space i have right now and i have to share the garage with a lot of other stuff during this build. thank goodness this boat is just under 14 feet long.
anyway, today i got the strongback out, a work table organized and just starting to get everything where i need it to be able to start. tomorrow i hope to start getting the forms set up on the strongback. whoopee!

I'm not intending to hijack your thread hspira, but this is the progress on mine after about 45 hours work, including cutting forms and mounting on the strongback.
I'm working on the recessed cockpit today and will also fit stem and stern pieces.
Howdy,
been off-line for the better part of two months between some family issues and moving to our new house (still in the DC area...but now on the virginia side :).
the movers were eager to show me that they could move my project and i was pretty exhausted....so i let them. it got here just fine and today i started work again. the step today was i put the cockpit apron in which was a pretty interesting piece of work.
this is actually the first time i took a precut cockpit apron and installed it on strip built after the deck had been stripped...so i found cutting the cockpit opening and fitting the apron to be a pretty time-consuming piece of work. but it's all good now.
this was also the first time i used cryanocrylate glue with the accelerant to tack weld (which is how i attached the apron). don't know why i waited so long to use this technique. really works well. now to see if i can get moving again fast enough to finish this boat this season.
still on track for a total weight of 25 lbs....so am very happy with progress so far.
 Ross, on your build which you posted above, i can't see any of your pictures.....maybe you can try again.
h
The pictures are coming up for me, so I don't know what's happening.
I'll try posting the latest in a day or so.
RossM,
The actual server error is:
{"error":{"code":"EC-4008","requestId":"68a69300-e3cd-11eb-c000-7187066d7030"}}
The images are stored at:
https://apis.mail.yahoo.com/ws/v3/mailboxes/@.id==VjN-NojBQ4LpyMq2ACDBEVvBun5OAyqkoiBBGou9JQi8tnMQdIj-LABTeWL_XZdZ9ZlqHZaDHvUEGGFvhGTyyrEl4g/messages/@.id==AFCikBAJ0gnGYNO-AQjdiIdIzaU/content/parts/@.id==2/thumbnail?appid=YMailNorrin&downloadWhenThumbnailFails=true&pid=2
It looks as if you have linked directly to an image in your mailbox. Of course you can see them because it's your mailbox. We can't. You need to rehost your images to a publicly accessible platform if you want others to see them.
Laszlo
Thanks Laszlo. I'll have to upgrade my computer skills!!
thought i would provide some updates on the project. i am starting to progress again after dealing with a death in the family and a move to a new house. today i locked in the deck color which is a bit unusual....and if it does not work out, we will resort to paint.

 in a nutshell, i am breaking free from my signature dark reddish brown hulls and going for a white pickled deck that will have some mahogony accents and a dark stained hull. the challenge was finding an epoxy- compatible white coloring. with some help from nick schade and some other chemical research to point me in the right direction.... and a test piece that confirmed (hopefully?) the compatibility with epoxy, i committed tonight with the whitewash of the stain and a skim coat of epoxy to lock it in place.
i have been doing a little summer paddling and the heat buildup on my dark builds when they are in the sun is incredible. feel like i can cook an egg on the deck....so i would like something that runs a bit cooler and, hopefully, will be visually interesting.
my hope is i can be on track to at least paddle it towards the end of the season if i can start to maintain a pace. i have also bought a set of maroske fittings that i am going to try out and will report on how that goes.
while i am working on the hull, also working on a carbon fibre skeg for the new boat. its a bit of a process but looks cool and a very inexpensive, bullet proof, easy build. below is a picture of the bits starting to come together....still some work to do.....but a nice side project while working between other steps.

still on track for an overall weight of 25 to 26 lbs....so watching all that carefully.
h
I appreciate the ongoing commentary and beautiful work here!
With your focus on weight, I thought you should know the quote from Antoine St. Exupery (best known as the author of "The Little Prince") who said (in French - so lousy translation, probably):
"The design is not complete when you've added everything you need; it is complete when you've taken out everything you don't need."
He was an aviator (and designer) in the early days of flight; ounces mattered!
It's been a couple weeks and thought i would provide an update. since i had my last post i lost a week out in los angeles but am now back at home for a 30 day stretch so diving in again.
my target right now is to finish the underside of the deck while i keep the hull safely on its forms. tonight i finish a skim coat of raw epoxy follwed by a skim coat of west systems 407 filler to fill in any imperfections in the underlying woodwork - this helps keep the boat light and makes the glass work which i will do tomorrow night very fast and easy and with little if no voids (little un-wet out glass strip) because the wood is sealed as well as any little gaps have been filled. in addition, in shorter sessions i have been building out the bits on the inside and for hatches and skeg.

here is a close-up of the skeg with a carbon fibre blade and paolownia housing:
 i will be doing a check-in weigh- in shortly to see how i am doing on being on task with respect to the 25.5 target weight for the complete boat. i do have a bit of a concern that the 3/16 paulownia hull is a bit more fragile than i want in certain areas.....and may address that issue with some addiitonal glass beyond the planned layup in the cockpit area. my plan, as mentioned above is to treat the boat carefully like a rowing skull....and i am trading the convenience of a light boat with an understanding that this is basically a flat water boat. but i don't really have a sense of things while the boat is still on the frames and with only one side glassed....so we will see.
in the meatime, i was also able to get a paddle in before Ida blew through the other day...
 24 hours after this picture, the river rose almost 5 feet in this section and my access point was closed off..... so stayed in the shop and worked on the new build.
h
so the deck underside got glassed per schedule....had my timing a bit off so i was up at 1 AM and again at 6 AM to finish this work;
 above is the picture after the glass work. a couple things to note if you have been reading this thread, 1) the glass i am using is s-glass....a signficantly stronger and substantially more expensive material than e-glass (which is what a normal kayak kit ships with). so i am very careful to cut to minimize wastage. i only ordered 10 yards 60 inch wide for the entire boat. so each 5 yard section has to do a hull section and a deck section.leaving only about 3 inches of extra down the middle at the widest point. 2) i am working on building light so i was very attentive to my skim coats and ensuring i had no holes or crevises that would fill with straight epoxy....and have been using a putty of west 407 filler for the little fillets and gap filling.
the next picture highlights that i want to be careful to wet the glass out....but not try to fill the weave. this is the inside of the boat and while there will be some more reinforcing glass around the cockpit area, i am trying to minimize epoxy weight. so using the light to help highlight that i have the glass wet out but not pooling epoxy (adding unncessay weight) is an important part of the process.

the deck for the next 24 hours is now taped back to the hull to ensure the shape is held while the epoxy completes its cure.
h
It's a quiet, rainy day here in the DMV...so my project is getting a bit more attention than expected.
i am going forward with getting the deck ready....and then will come back to glass the inside of the hull when the deck is pretty much all set up. the hull is nice and safe on the forms...so no issue with the wait.
today i am working on the coaming. a bit of information to share for petrel play strip builders....CLC can sell you the coaming risers and coaming from the petrel play stitch and glue.....and it all fits the coaming sill for the petrel plan strip build that comes with the all woods part kit. this way you don't have to (if you don't want to) make risers and a coaming from strips. anway, i thought it looked cool and did not have a particularly negative impact on my desire for weight.
so here is glassing the underside of the coaming before it is glued to the risers:

and here are the risers (this is a stack of 4 pieces of 4 mm okoume cut 1/4 inch wide (so same width as 1/4 inch cedar) and this is all glued to comform to the hull....but not glued to the hull yet as there is a layer of saran wrap right now between the hull and risers. this way i can remove the risers and clean them up very nice.
the other thing i would highlight which is relevent to hybrid and strip builds as well as shearwater builders, is that when i do this, i have the deck taped temporarily but tightly to the hull. this way, as we add structure to the deck, we ensure the additional structure (coamings, hatches, etc) are holding the deck in its correct shape vs taking a misalignment and locking it in. makes for much easier final assembly.
h
oops....looks like i pasted the wrong picture in the second picture:

the other thought i wanted to share on this build is that i did want to ensure that the coaming/risers and sill area would be strong and that is also part of the reason i decided to stay with okoume here.
h
another quiet day and pondering a lot about layup schedule....and balancing light with not too fragile. and re-assessing how i want to handle fittings and deck hardware.
i have almost finished the deck and thought i would do my first interim weigh in. at this point i am a bit over 7 lbs for the deck fully skinned on both sides and coaming installed.
 i am expecting to add between 1 to 2 lbs to complete this section, most of that weight is going to be in hatch hardware and deck fittings. plus there is a about 8 oz in some final reinforcing glass on the backside of the deck around the cockpit.
overall....easily on target for sub 30 lbs.... just depending on sorting out fitting options on where that will place me between 25.5 and 30.
h
i thought i would share the latest update on this build. i have completed the deck and am now turning my attention to finishing the hull and making some final choices.
so first on finishing the deck. i decided to go with maroske fittings. these are the latest and greatest 3D-printed parts that are GFLEX epoxy plus some fibre glass to secure them to the underside of the deck. this is the picture of the insde work in progress:

and this is the picture from the other side.....a very clean look. the 3D-printed parts are way easier than making your own maroske fittings:

as i mentioned, i am now down to glassing the interior of the hull....so I have been scraping and sanding it smooth. am taking my time with this becuase it is just best to do this slowly to get a nice smooth finish that will facilitate keeping the boat light. my goal is to finish the interior glass next week.
i also wanted to share a link to two sites i recently came across:
the first is a link to a discussion about building surfskis with paulownia and the results that they are getting. i thought mark nye would really enjoy this:
https://paulowniatrees.org/media/documents/May_2018-NL.pdf
the second link is to a site referenced in the article about a version of carbon fibre that seems to be worth experimenting with becuase of how it can be layed up with signifcantly less epoxy than other forms of carbon fibre.
https://compositeenvisions.com/textreme-1013-hs-spread-tow-carbon-fiber-12k-39-37-100cm-2-36oz-80gsm-uts50/
at this point, for those following the weight, i am on track and at ~ 20 lbs right now for the boat absent the internal glass on the hull. so if i can keep the glass work and remaining bits to 6 lbs or less....i will be where i thought i would be.
anyway...that's the update.
h
You'll have to be careful when you go to toss the boat up on the roof rack--she might get excited about her light weight and take a notion to fly away on you! <;-)
Seriously, while not a kayaker myself, I've enjoyed reading your progress notes here.
.....Michael
Looks like a great project!
I will be interested to hear how th boat holds up for you. I recently took a little more interest in paulownia when I started looking at race SUP kits which all use paulownia.
Good read on the article. Jim Budi is one of the gents that I race against. Jim is quite fast regardless, but his 26# carbon/paulownia boat surely helps. His one complaint is that it is quite fragile. In comparison, my Yukon has the same measurements but weighs 36#.
Picture below is my heavy weight Wahoo between his two leComps the day we scouted the USCA Nationals course. The designs are the same except for cockpit position.

the wife is away on a business trip so my boat project has got a reasonable amount of attention this week.
i completed the glassing of the inside of the hull and installed my custom-made skeg box over the last couple days.
the first picture is the skeg box install and a glimpse of the interior glass work. i took a lot of extra time on the interior to get the surface smooth and fare to minimize excess epoxy that collects in holes and cracks and strips that don't align. anything i thought needed a little attention was filled with some low density filler....but very little of that was used. the glass was carefully groomed while being wet out to have no pooling epoxy....so i was really pleased with how that came out.

the next picture is the hull and deck temporarily taped togehter (how i store it now that it is off the forms) with the skeg installed.
the weight of this structure based on tonights weigh-in is at about 21 lbs. it is, so far, very easy to pick up.

based on the calculated weight of all the component weights (see the bill of materials spreadsheet earlier in this thread), i appear to be within a 1 lb of the expected weight. (see all the component weights and subtract all the rigging items and taping the seams weight)
i am taking a lot of emotional stock now trying to sort out any specific glass reinforcements that i might make on the inside before the hull and deck is joined. this is related to the concerns of is it too fragile for its intended use.
mark, thanks so much for the picture of jim budi's boats.....can you provide any more details about what he meant by 'fragile'? the boat is clearly not a "bang it into the rocks" boat and the mission of this project is basically an easy, fun boat for my local paddling on protected waters and to explore the mid 20 lb weight area and general cruising capability/speed at a relaxed effort of this vs my longer boats.
h
time for an update on the project....things have settled down a bit and i am able to devote some time....and am trying to finish all the major epoxy work prior to winter.
over the last week or so i finished everything that can be done inside the boat and then finished today with the taping of the deck to the hull (no going back now :( ). so this is an exciting time.
i thought i would share some of the techniques coming into play on this boat that folks might find interesting.
the first two picture sets is of the end pours which were made of small blocks of paulownia, then drilled out to 3/4 inch, filled and then drilled out to the final 1/2 inch. this is a very light and strong approach to end pours at less than half an ouce apiece. the first picture is the end-pour block measure to ensure 1 inch thickness around the final hole:
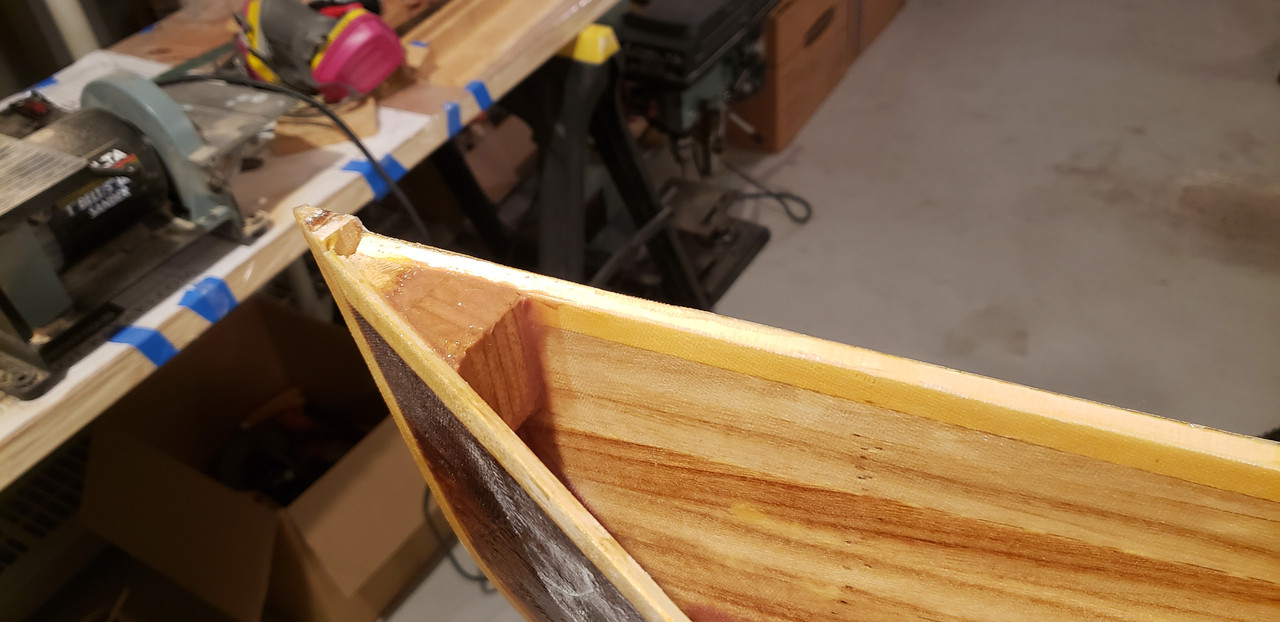
and the next picture shows the result after the hole is drilled, filled and re-drilled:
 in another post recently, there was a discussion of staining.....and i agree with bubbleheads admonishment that when you work with stains, you have to plan very carefully. the hole fill here was made with woodflour batch that i have that is stain matched to the hull. so i have a couple different woodflour batches to match the parts of the hull it gets used on.
the next set of pictures is some of the work prepping the minicell foam bulkheads. these are still a bit oversized relative to where they will be positioned....but i use the opportunity before the hull/deck is taped to get them very close to what they need to be. just a lot easier working this way then trying to perform the whole operation after the hull and deck are mated.
this first picture is the initial placement and rough cut:

the second picture is after refining the cut and these are now on the side awaiting their installation after the hull and deck are joined:

the next picture is the final last check fit:

then it is on to taping and mating the hull and deck:
here's the jig for holding the boat up on its side: it's basically two 1X2 inch peices of lumber securey screwed into the saw horse. after all this work, its not a good time to drop the boat....so i try to ensure steps like this have the boat properly secured.

the final picture is the 2 inch kevlar tape i use for joining the hull to the deck on the inside.
 the kevlar tape is ridiculously strong....and light compared to 8 oz glass tape. on the outside, of course, i will use a clear glass....but i am a real fan of the kevlar on the inside.
the other big news is joe greenley of redfish kayaks told me my custom seat for this boat shipped today...so i should have it shortly. if you have not checked out his work, its really very nice. a bit of extra money to have him make it....but not that bad an investment where comfort is critical. also, i get no joy from making seats....so its a nice to have him to be able to do that for the kayaking community.
anyway, that's the update.
h
well ...that's this weeks update.
well,
we are down to the last week before launch...or a hopeful launch for an autumn paddle...before the season officially ends.
since i checked in last, we completed the outside seams. we did this work with 2 oz e-glass tape i made from 2 oz cloth as it conforms easily to the shape and required minimal effort to sand. in the spirit of keeping the boat light, the center section of the tape is doubled up so its effectively 4 oz tape in the middle 1/3 and 2 oz tape in the ends 1/3.

the boat was also sanded.....not too tough as i was careful with the epoxy work. but this is a very curvy boat so you had to take your time to avoid 'sand-throughs' (which happened)...but i was able to recover and i was reasonably happy with the result.
the next element was getting the minicell buklkheads in which i did and glued in place with 3M 5200. i was happy with this work and thought the bulkheads were pretty clean and tight. this is a picture of the rear bulkhead which is a bit tricky given the recessed sill on the petrel....but i have a secret on how to approach it and it worked great:

the forward bulkhead was also a nice tight fit so there was minimum glue required to cement the bulkheads in position

the seat from joe greenley at redfish kayaks came and was an amazingly perfect fit....thanks joe:

i then applied 6 coats of bristol clear (not amber) 2 part varnish. this was the first time i have worked with this product and i found it easy and fast to work with. i hope its wear and tear qualities are as good as advertized
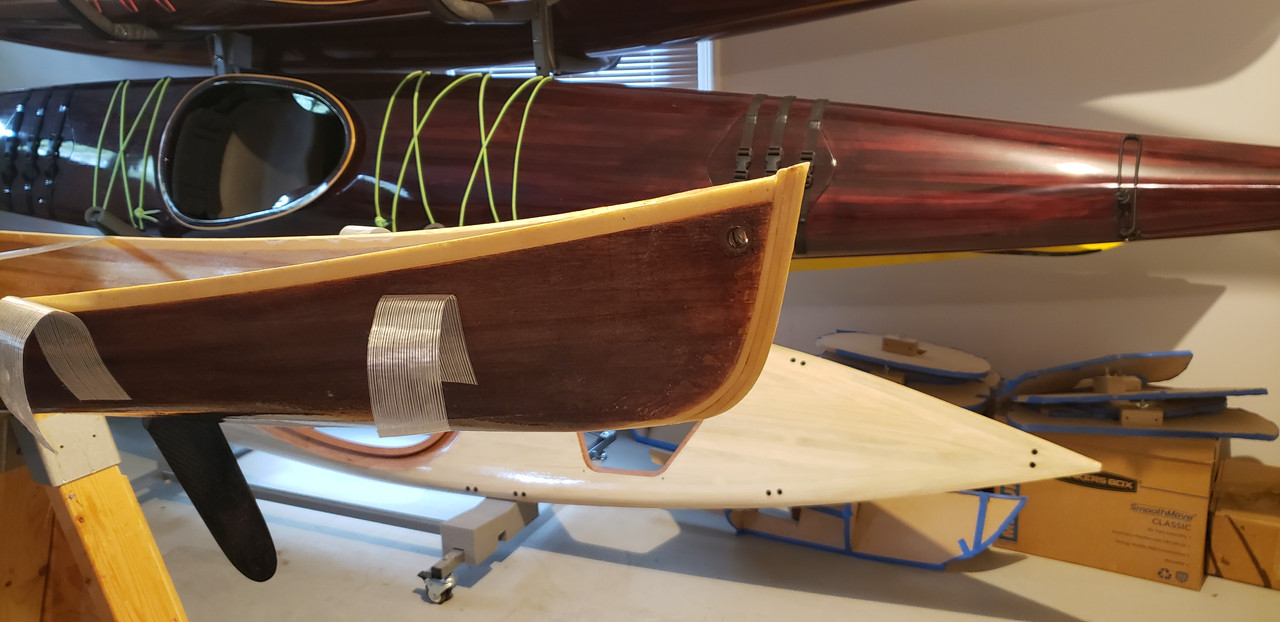
here's a shot of the rear quarter with the hatches coming together:

and here is a shot that gives some perspective of the hull shape and the rounded ends and hard chine aft of the seat:

at this point the boat is a tad over 25 lbs. the next step is the bungees (supposed to arrive by post tomorrow) and perimeter line and then we can take her for a spin.
anyway...that's the update.