Yes, those fabrics work the same and are almost the same as commercial peel ply. The stuff from the fabric store doesn't have a coating like some pp's, and the texture won't be as perfectly tuned as pp, but unless you're doing this for a living or needing critical secondary bonds without sanding, it won't matter.
But for that outboard bracket, I'd buy some clear mylar (art store for sheets, or McMaster-Carr for rolls) and use that for a much better surface finish, and a much more sure release. (or coat the mold in slightly overlapped layers of packing tape, and sand away the ridges during the paint process)
And while we're improving things...
Make the mold "male" instead of "female", out of 3/4" or thicker material, and round over any outside corners but don't bother to fillet any of the inside corners, and don't bother to coat the wood (or mdf or particle board or whatever is laying around and pretty smooth).
Make some cauls (flat slabs of wood) that fit the sides and top of the mold. The side cauls will have one corner radiused where it presses into the flange part of the bracket. None of these parts need to be coated, filleted, or waxed, so this goes together quickly and easily.
Lay a sheet of mylar over the male mold and trim it so it overhangs by an inch all around. Cut another to match, and then several sheets of glass to get the thickness you want (figure .0018 inches per oz of fiber for hand layup, and closer to .0014 if the part will be pressed, as here. So for 1/4" of glass, use 178 oz of fiber thickness (this is about the same as the 28 layers of 6 oz that the author recomended)).
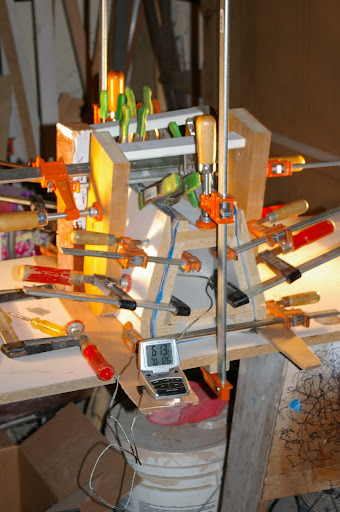
But go buy a yard or two of DB1700 (17 oz biax) and save yourself the pain of all those little layers! Wet out the layers individually on a plastic sheet, using a squeegie to first wet and then remove excess resin, adding the first layer to the mylar (flat on the bench) and each layer on top of that, add the second sheet of mylar, then transfer the whole sandwich to the mold. Clamp the caul to the top (what will be the motor surface) with at least four c- or f-clamps, grab the outer layer of mylar and fold/bend the sandwich down around the mold, press the two side cauls against the outer sides, a little above their final location, lightly clamp them across the mold, then use some longer clamps to pull the cauls down toward the flanges which will stretch the mylar over the outside corners (which are fileted in the author's example), then increase pressure/add additional clamps across the cauls. You should see a fairly significant amount of resin starting to ooze out between the mold and the cauls, so anticiapting this you could wrap your clamps with tape and place some plastic under the work zone...
You can slip a wood chunk in the glass sandwich if you like, or just add an external piece that can be replaced as wear occurs.
You'll use probably 1/3 the resin the author did, your part will be very smooth on both sides (you still need to trim the edges to shape and sand those), and the part will weigh about 1/2 - 2/3's what the author's did. It'll also be stiffer for having used uncrimped glass (the biax, versus woven).
And you'll have some simple pressure-mold making experience that you can apply to a thousand other little boat projects!