Just started a PT 11 build-wondering if there are others doing the same? So far, I am very impressed with the kit and book-Russel Brown put alot fo effort into the details!
Not building one myself, but if I ever have a "big white yacht" as Roger Barnes calls them, a PT 11 will definitely be on the foredeck. I stumbled on this boat builder's channel who did an episode on his yacht's tender, a PT 11 https://www.youtube.com/watch?v=LpwEScmVx6s
I am about 2/3 of the way through building the non nesting sister ship the PT Spear. Been a great project so far, keen to get her finished so I can sail her this summer.
Nice-I would assume the build is similar save cutting her in two! I am about 1/2 done I think and am enjoying the process. By all reports (I have never seen one in the flesh other than my kit), the boats row and sail beautifully. I intend on using mine as a tender fo a cruising sailboat so the nested size on deck is great. Will you finish her bright inside? I am going to paint mine with Awlgrip and only keep a few bright spots to fancy her up a bit.
Hi David,
I originally thought I would simply row and sail on the lake at our cottage, but am now thinking I may also use it when away for extended cruising on our sailboat. It should fit on the foredeck ( 53’ sloop) if I did take it along. At this stage am planning on a bright finish on the inside. Another few more days and I should be all done on the inside and flip to work on the outside. I live in Vancouver and on Vancouver Island and there could be a few more of Russel’s boats here in the Pacific NW. Attached are photos showing work in progress.


Hi Rob,
Nice shop! She looks good-are you not putting the sailing rig in her? I will post photos of mine.
Hi David,
Shop is a bit small for this build, as I have had to move a number of tools out of the way, hence the desire to finish building the dinghy so I can get back on my “other” build list! I did buy the rig and sail plus the foil kit to also build.
Hi, Dave.
I have just completed my PT Eleven build, or 99% done, as it is not assembling after painting the two halves. In the water, the boat is very stable, considering the two hulls were not bolted; only the alignment clips held them together. Enjoy your build. Just remember to read through the entire instruction manual, and re-read several steps ahead. The manual does a good job of sequencing steps; however, with so many steps, it pays to look ahead.
Hi Frank,
I am getting close to done with mine as well-about to start painting her (roll and tip Awlgrip 545 primer and then spray Awlcraft) before the final bits and pieces of rudder hardware, hatch, rubrail. Can’t wait to get her launched and in use! What do you mean that the hulls would not reassemble after painting? Sounds bit odd, paint should not add much dimension to the aft and forward sides of the bulkheads?
I agree with you about the manual-it is extremely helpful and well written. I tried to follow the advice I was given to read the manual at least once before starting-I ended up having two copies and would read ahead a bit before each day of boat building which was helpful. I started mine in Dec 24 and have not kept record of hours, but have kept at it regularly-how long have you been building yours?
Ugh, I’m working on the PT-11 and I’m ready to start again! Ha ha. So many lessons so late. I’m only about 25% through, got the shell glued up, just finished the inwales and will start on the filleting soon. But I messed up a few times.
-
I didn’t really check hard enough for a hull twist. When it was flipped over it looked pretty darn good but after I finished gluing the seams and flipped it back I realize there is a bit of a twist, the transom is a bit tilted to one side. Sigh. Too late now, all glued up.
-
I started using the wrong syringes. I just got some medical plastic ones that had very big dispensing tubes but I didn’t know any better. I just recently got the approved west system syringes and suddenly everything is easier. But I’ve got blobs all over my hull already. Double sigh. I’m sure it will all sand out.
Rob your shop looks a dream compared to mine ![]()
I’m on Vancouver Island.
Don
Hi Don,
I am approaching the finish line!

Here is my boat with two coats of Awlgrip 545 primer-once she is painted I just have the odds and ends assembly of rudder gudgeons, fore hatch, oarlocks etc. My build has gone well and I have really enjoyed it. I have found the manual to be superb and worth a few readings and reading in advance to avoid any mistakes or missteps. Can’t wait to get her wet!
2 Likes
Looks amazing! Good job! I just sawed the bow off mine, getting ready to shape the stem. So much to do ![]()
Hey, I am thinking of posting comments on how my PT-11 is coming and questions that maybe some experienced PT-11 builders could help me with… This seems a good place but if anyone thinks I should start my own thread just tell me.
I am currently on page 78 of the manual - “Fair Hull Chines” - this morning I was sanding the goobers off the outside of the hull and trying to get the chines sharp.
As I mentioned previously, I started using the wrong syringes and had a LOT of goobers on the hull, dribbles and oopsies. In desperation I used my gloved finger to smooth out the giant blobs along the seams and try to push the thickened epoxy into the seams. Created a mess but also flattened the bead of epoxy to virtually level with the hull. Then in many places the epoxy sagged into the seam and so was not proud of the panels. The manual says you want the chines sharp, but if there a sunken seam that didn’t seem possible. So I went over the seams again, sanded the sunken areas and tried to put more epoxy on there before sanding. Seems to have worked somewhat. I’m attaching an example of where it is still a little sunken ![]()
I would also like to comment that since I had so many annoying epoxy globs, my first thought was to use a power sander to remove them rather than a sanding block as the manual said. I used a palm sander which was fairly easy to control and not over sand .
After that I followed the manual with the appropriate 11" long sanding block with one edge taped up so it focuses on the chine area not the panel, as the the manual said. Holy crap, does that do an amazing job of sharpening the chines and sanding exactly where it was needed. Feel quite proud of my hull now compared to when I woke up.


I also have a problem with my stem. When I was wiring up the hull, I shaved too much of panel #2 on the port side (this was done to open the seam a bit for the epoxy). THe problem was the panel had a twist and did not want to play nice. I did what I could by wiring a spare straight peice behind panel on the inside to try to pull it back to the right location but as you can see, I was not fully successful.
However, I am developing enough experience now that I feel like I can just figure out solutions on my own and implement them ![]() For this one, I’m just trying to building up the area where the hull seems slightly stove in with very stiff epoxy, kinda like bondo. Wish me luck.
For this one, I’m just trying to building up the area where the hull seems slightly stove in with very stiff epoxy, kinda like bondo. Wish me luck.
You don’t need luck, you’re doing the right thing. Epoxy/woodflour putty will fill that in nicely, then sand it to shape. If the instructions don’t call for glassing that part of the boat, I’d add some just over the filled in part just to restore the tensile strength of the missing lignin fibers.
You’re definitely on the right track,
Laszlo
1 Like
Yes, you can fill and fair that area and yes, the entire boat gets glassed on the outside. Read Russell’s hints and tips in the manual-he goes over all kinds of issues that a new builder might find and his guidance is clear and concise. Definitely use the West syringes, but resist the urge to use extra epoxy anywhere, as per his advice-you can always go back with a syringe and fill any low areas on the seams - this is much better than sanding blobs of epoxy. Plus, too much sanding like that will leave low spots in the soft plywood while you are grinding away at the epoxy around it…
1 Like
Thanks for the feedback Laszlo and David. I had some problems with my account and couldn’t post for a few days. I will try to upload more pictures in the next few days.
Hi guys, I’ve hit a few busy patches and haven’t been able to put much time on this project recently (that is code for “the wife came back from a trip”). But I think I’ve got the stem sorted. Below are a few pictures.
Before I get into that however, what do you guys do with your tools? I’m thinking rollers. Do you bother cleaning them with denature alcohol or acetone or do you just chuck them? I’ve been chucking them but wondering if I’m the only one.
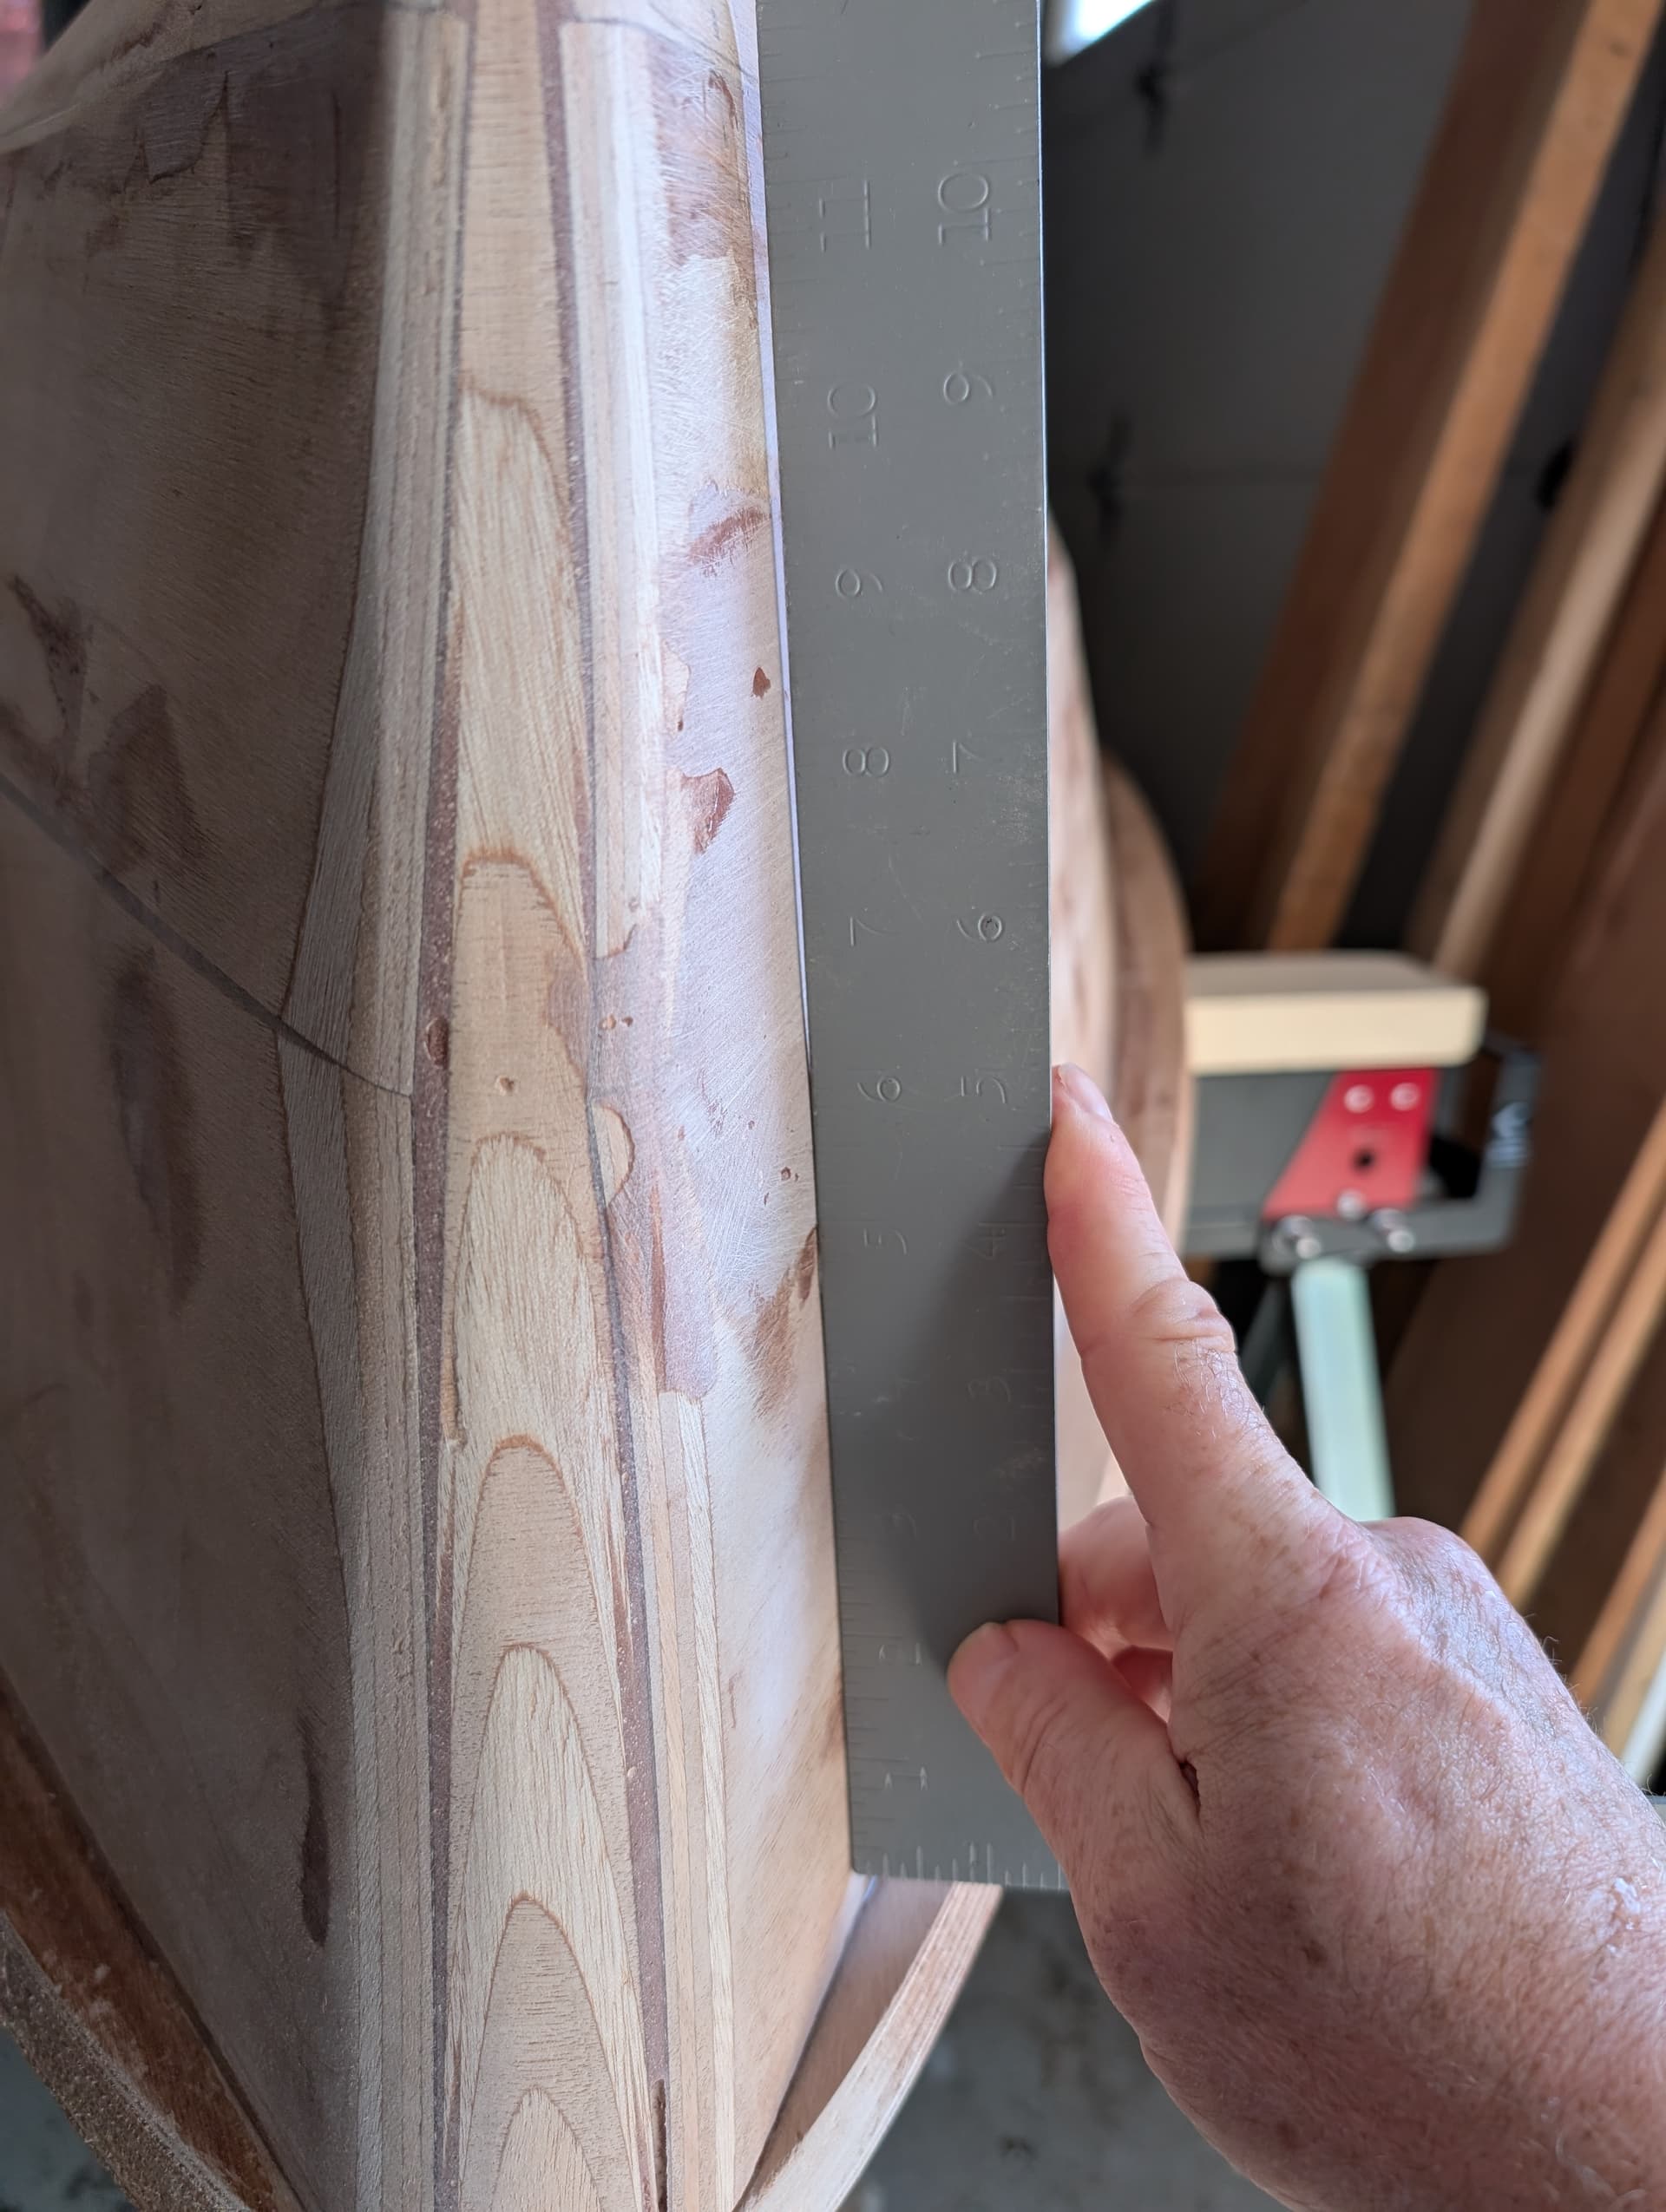
Here is the stem. It doesn’t necessarily look straight because the wood lines are going all over.

However the straight edge looks good to me. Had to sand away material on the left side of the image and build up an epoxy filler on the right side. Moving on to the main bulkheads and doublers and side projects of the daggerboard box and the aft buoyancy tanks.

I clean and save everything I can, including filleting tools and mixing cups, and brushes when possible. Foam rollers are a tough one though. The amount of waste created in the construction of these boats is a challenge I hadn’t considered when I started but am very aware of now.
1 Like
donzo,
Nice job on the fix.
Rollers are too hard to clean, so I repurpose the used ones. After they have cured hard, I wrap them in sandpaper and use them to sand inside curves, like fillets. They still get thrown away, but I get one more use out of them.
Laszlo
1 Like