Pat
You are correct, for a 1 inch scarf stair step the pieces one inch. You are also correct about the good and bad side stacking proceedure. Here are a few tip I'v developed over the years scarfing plywood.
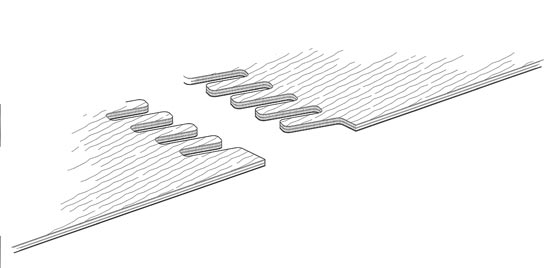
1. Stair step the scarfs the length of the scarf.
2. Alternate the sides of the plywood so that you end up with two good sides up.
3. Place a dummy/waste piece of plywood on top of the top piece of plywood because when you sand or plane the top piece of plywood you have a tendency to round over the top edge.
4. Place a firm piece of wood or a flat steel plate or the sharp edge of you table saw under the bottom piece of plywood in the stack. The bottom piece of plywood will be cut to a feather edge and you want it well supported in the cutting process. This piece of material is even with the edge of the bottom piece of plywood. You will now beable to run the heel of you sander or plane below this firm edge.
5. When cutting the scarf use the laminates as a guide. That is the glue joints of the laminates will be straight edges when the scarf is correctly cut.
6. For 3/4 inch plywood I use a power plane but this is not necessary for 3 mm material. For my Kaholo I used 60 grit on a 5 inch disk sander. You can also use a hand block plane that is razor sharp and finish up with sand paper on a block.
When glueing scafts I do the following:
1. I tape off the edges of the scarfed joint the full width of the scarf. Where ever you don't want glue put down tape. It is a heck of a lot easier to pull off tape than sand off glue Also, tape is cheaper than sand paper. During the entire build I always taped off the boundries of the glued joints
2. After I have taped off the scarfed joint about 4 inch back from the joint I put down waxed paper, spread thicked epoxy, and place the piece of plywood to be glued. The tape on the edges of the scarf will assist in placing the pieces. Now you can place a piece of tape the full width of the scarf right on top of the area that the glue is being squished out of. Then put down a second piece of waxed paper. On top of this place a 1 x 4 strip of wood and weights.
Note, when scarfing the two bottom pieces to the aft bottom piece be sure to overlap the bow sections in the area of the tip of the bow and frame 2. This detail may not be obvious but you will see it if you extend the center line with a straight edge to the bow.
When cutting out the 3 mm ply I used a sabersaw with a metal cutting blade. I cut next to the pencil line and then block planed to the edge.