I have a shearwater sport hybrid 14 I am currently working on and ran into an issue putting my deck forms in. Form 8 and 9 are not touching the sides as they should be. The kayak appears to be too wide. The forms appear to be installed correctly. Here are some pictures to better show and the blueprints for the boat. http://imgur.com/a/Bk48ObY
My question is do I need to run a piece directly across the top and pull the sides in more? Did I mess something up? The other forms seem to fit okay and are touch the sides.
Hi Tempest 170.
i looked at your pictures. what i would say is that it is fairly common in these boats to have some drift from the plans as each piece of wood/side will have a natural flex to it and that flex will not map to the plans.
that said, if the sides are bowing out so much that the boat is getting significantly wider than it should be, i would pull in in more closer to the design shape. to the extent i can do that and the hull remains fare (e.g. does not develop a bulge or depression....but remains a visually smooth curve) you are all good. and fwiw, its pretty common to need to do that on these designs. its easier to do this when you are actually filleting the hull to lock it the right shape in place but it can be done now too subject to the fareness comment.
how i do it is i used strapping tape with glass fibre (sample of this is: https://www.amazon.com/MAT-Commodity-Fiberglass-Reinforced-Tape/dp/B07W4LK3C4/ref=sr_1_2_sspa?dchild=1&keywords=glass+fiber+strapping+tape&qid=1629578863&sr=8-2-spons&psc=1&spLa=ZW5jcnlwdGVkUXVhbGlmaWVyPUEyS0JNWVgwRU9CNjY3JmVuY3J5cHRlZElkPUEwMDg3Njg3MUI2N0o2RVI4RFFENyZlbmNyeXB0ZWRBZElkPUEwOTc3MTgxMU0zMTJQUlIwR1pFSiZ3aWRnZXROYW1lPXNwX2F0ZiZhY3Rpb249Y2xpY2tSZWRpcmVjdCZkb05vdExvZ0NsaWNrPXRydWU= )
across the top of the hull to pull the sides together/hold it in place while i am hot-glueing the forms in place. i will often keep the strapping tape in place while building out the deck so the hull gets comfortable in its correct form.
if you can't make it happen while keeping it fare with strapping tape, send another note and i can suggest to you how you could approach it.
h
   H as always you are a wealth of information. I will order some of that strapping tape. In the meantime I used some new straps I had from harbor freight to see if I could even pull it into dimensions. It went right into place now. http://imgur.com/a/V1rw2nf
I wasn’t aware that you would have to pull them back into shape but it makes total sense. Will the hot glue hold it in place or would you stick with the tape right until I build the strip deck?
i kept the strapping tape in place even after hot glue. my experience was i had the forms not hold into the hull with hot glue as i was stapling/pressuring the strips into place. so the tape provided a lot of confidence that things would stay where they were supposed to.
i also used the strapping tape to hold the completed strip deck in the right dimensions after i popped it off the forms. when you do that, it will naturally try to flatten itself/widen out. i used the tape to basically hold the deck and hull in right shape until the deck was actually joined to the hull. this is especially helpful if you have to walk away from your project for a week or more.
h
below is a picture of a hybrid night heron....showing the use of the strapping tapen holding the deck in the right width while working. these hybrids are really beautiful
 :)
:)
  That makes total sense to me. I will order the tape today. Now that I have the deck forms in a better place I can start working on beveling the sheer clamp. I had to reread that section multiple times to fully understand what was being asked. Lol
   Also your kayak looks amazing!
   Just wanted to follow-up here and thank you again H. I was able to get the boat closer into shape and now have the strapping tape to keep things in line. I was able to hot glue the forms into place tonight. Here are some pictures… http://imgur.com/a/gXfSCyz
   I am going to keep my thread going with more questions. I am starting to lay the strips and I am not happy with the way the stern is coming out. I will blame it on the fact that I am new to this. I am not sure how to fix it because the end seems to come up to a point versus laying flat. Unless this is how it is supposed to be? Do you think I could cut the ends a bit shorter and use the kingplank to run down the middle and to the end. Here are some pictures to help understand.
http://imgur.com/a/C24M9ek
Hi Tempest170,
I took a look at your pictures. I would chalk most of this up to you being new to this. Also, the stripping is the hard part. You are making each piece now…..you don’t have the CNC machine cutting everything to within 1/100 of an inch of where it is supposed to be.
First, I would pause for a bit and make sure you have your planking plan – that is the order/general pattern you are going to use. I have attached a picture of the page that shows some of the basic schemes…..and while this is focused on the bottom of the boat, you can use similar plans (or variations of them) on the deck as well.
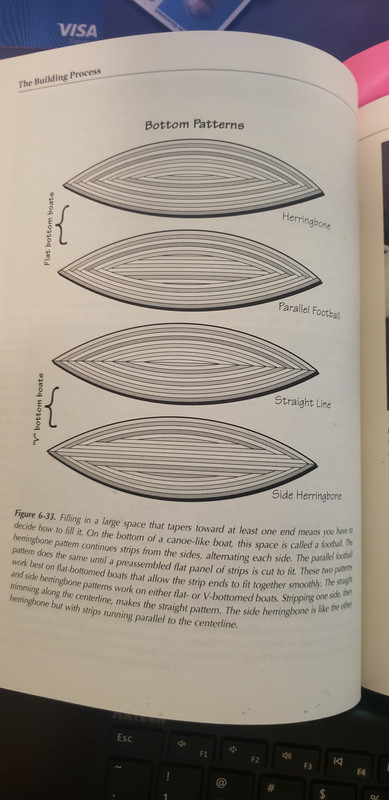
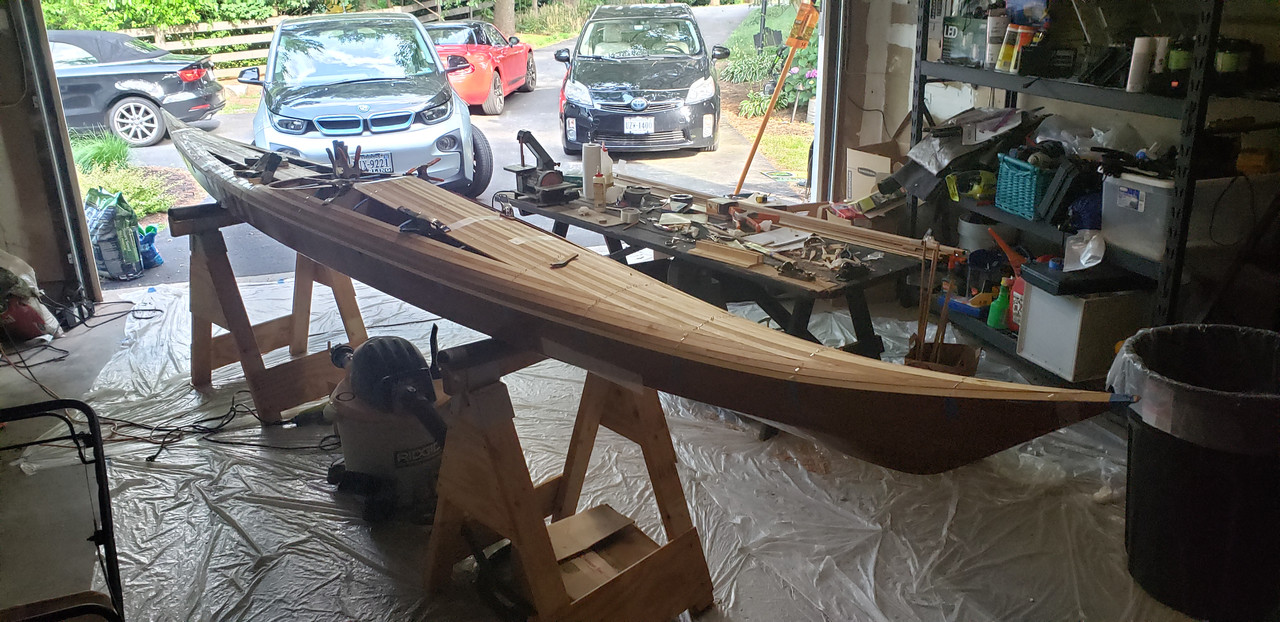
When I build decks, I predominantly use the side herringbone pattern. So the first strip is the side, the next one is down the middle…and alternate from there. here is a picture after a number of the strips have been laid but the deck is not complete yet. but the key here is order....the side strip went first, then the middle....then the next side then the next middle...and alternate until completed.
If you don’t have a clear plan in mind before starting….you will likely create a mess…..and based on what I see here, you are not following how you would build out any of these patterns.
Second, you may want to slow down and take a bit more care on your cuts so that the basic pieces mate up with less of a gap. This is tough and takes some practice. As you point out, you are really now working in 3D….the decks are not flat, they are peaked/rounded. So even the act of bringing two piece together at the ends is not a simple triangle. My approach is typically to cut everything proud (bigger than needed) then use a course sanding block or block plane to bring it into final shape…with a lot of test fits. It takes longer, but allows for more control. As you get the hang of it, you will find you can cut less proud (less excess) and you can speed up. you can also watch some Nick Schade videos and you will see how he lines things up carefully before he cuts....and little tricks you develop to get a good fit.
I would also recommend that you get one of these two books if you did not get one already: Building Strip-Planked Boats https://www.clcboats.com/shop/products/boat-building-books-kayaking-dvds/building-strip-planked-boats-nick-schade.html or The Strip-Built Sea Kayak https://www.clcboats.com/shop/products/boat-building-books-kayaking-dvds/strip-built-sea-kayak-nick-schade.html. If you are building a stripper for the first time (or a hybrid), I consider either of these books an essential reference item.
All things considered....you are doing great....dealing with strips the first time is really challenging. Like everything...there is a learning curve.... you can also just mess with some strips on the side to get some practice controlling cuts without committing them to your boat.
h
Thank you as always H for your advice and patience. I just ordered both books so I can review them prior to going any further. I think part of my challenge is that I was reading the Shearwater instruction manual and the pictures are a bit challenging to see in detail. The manual also doesn't have a pattern recommendation like you posted above which would have helped.
I purchased a dovetail saw from here last week so I can get cleaner cuts (found that the miter box saw was destroying the cedar). I will probably end up pulling up what I have down so far and trying again.
In regards to your strips that run the full length of your kayak, are you doing scarf joints with epoxy to hold them together? That was what the book said to do which slows down the build time waiting for the joints to dry before working them onto the boat.
for full length strips i use scarf joints with wood glue (not epoxy). still takes a bit of time to set.
but in my builds there are very few strips of this nature. on a deck the only ones i would have are the first strip down each side. the strip down the middle can typically be done with one piece because the cockpit apron breaks it up into two pieces and each piece is less than 8 feet.
all the other joints i have after that are butt joints becuase you can tie them into an adjacent strip for alignment.
h
As always, good advice from hspira above.
Like him, my only full length strips are the first ones on the shear and centerline. I tend to use the Side Herringbone pattern. For the rest of the strips, I just butt join them together on the boat at a 45. If you are careful matching the strips that you are joining, the joints are almost invisible. There is a joint to the left of each piece of tape in this picture.

You mention buying a new saw. That may help, but you can't get good tight seams with a saw because it is not precise enough. I follow Nick's technique of making the initial cut with a sharp knife, then using a small plane to get the perfect angle. As Howard suggests, take your time.

Thank you both Howard and Mark. Your pictures are all very helpful and I should have posted here sooner because things are making way more sense now. Also your boats are beautiful.
Do you have any suggestions for the type of small plane you are referring to? I ourchased a new low angle block plane at the start of this project.
Also when you put your scarf or butt joints together, are you doing them on a table first, letting them dry, then moving them to the boat? Or are you putting those joints together on the boat and tacking them in place to hold firm?
Did you buy the Stanley Low Angle plane that CLC sells? If so, that is an ok plane that will be good enough. The biggest issue is that the blade is dull new and must be sharpened before first use and frequently after use. If you think you are going to build more boats, I submit that spending more money for a high quality plane is worth it. If you watch Nick's videos, he uses the Lie Nielsen apron plane (the larger gold plane in center of the picture) which comes with a sharp blade and will hold an edge much longer than the Stanley. The LM Apron Plane and Violin Makers Plane (little one next to the apron plane) are what I use the most. LM planes are expensive but worth every penny. While you are spending money, go ahead and invest in the Veritas Honing Guide. It is not expensive and takes the guesswork out of sharpening blades.

For the shear/center strips, you will want to do the scarf joints on a flat surface so that you get a nice straight & flat strip. For the butt joints, I gdo them on the boat as I go. Once I have the strip in place, I usually put a piece of scrap behind the joint and then clamp it together so that it stays nice and flat. My finger is pointing at a butt joint.

Thanks Mark! Yes I bought the Stanley one and noticed it seemed a bit tough to use. I bought myself a Tuesday gift of the two planes you mentioned (might as well have the right tools for the job). I am going to take the 3 strips I already have on the boat as a learning experience and replace them with fresh strips that are done with this new knowledge as well as having two books to help me with this process.
I see in the photo you have two clamps off to the left and right that are intersecting your strip. What are those for? It looks like a cool jig to hold the strips.
Here is a better picture. I build mostly staple-less so I need something to hold the strips while the glue is curing. I cut about 40 U shaped pieces of plywood with the slot large enough to slip over the strip. I then push the strip firmly against the form and use a clamp to hold it in place. This is handy even if you are using staples because it is a good way to temporarily hold the strip in place before stapling.
The other lesson here is blood (between the glue bottle and the clamp). Those sharp planes are very good at quickly taking 1/8" of skin off your hands. You won't even feel it for about 5 seconds.
Last tip, buy a small craft bottle for your glue. The smaller tip dispences less so you have fewer drips and runs. When you do have a drip or run, don't try to wipe it off because all you do is smear the glue over a larger area, which will be hard to sand off. Let it dry, then before sanding all the glue gobs are easily removed with a scraper.

   Awesome. Thanks for the advice. I was wondering how you all avoid drips and runs when you squeeze the strips together. I will pick up a small squeeze bottle before this weekend. I like the idea of using the U shaped pieces. The book suggested temporarily screwing in small strips to hold them tight but I was worried about that since the forms are press board and seem to splinter easily. Thank you as always.
everything mark said.....
you can never have enough of those little plywood brackets. i use them too...extensively... even when using staples. i like to test fit pieces before committing to stapling, and a large collection of these really help.
on the butt joints, i take slightly different approach then mark. i make my butt joints with a 90 degree cut. i find 90 degrees (straight across the strip and straight through) very easy and for butt joints they work just fine. i use the same tecnhinque as mark described to ensure they line up by backing them with a strip until the glue sets. similar to mark, i find them basically invisible unless you go looking for them or if you mismatch the color of the butted strips.
as for planes, i get it all done with a stanley low angle block plane that i keep sharp.
and there is blood in all of my boats. mostly a little....but once a lot. and like mark said, there was about a five second delay before it really registered.... but that's a different story:)
h