Winter's here in Miami Beach, it got way down in the 60s last night, but if I fall in the 76 degree water hyothermia is a long way off. The Kaholo is great! Lots of interest from my kayaking friends and and the SUP people with thier composite boards love the grephics and the speed. My bent shaft paddle is hollow fir from the blade half way up shaft. The blade is 3 mm okoume with 6 oz carbon fiber on the face abd a graphic on the back. The lower (hollow) half of the shaft is stiffened with carbon fiber strands and the whole thing is 26 oz. By the time the water gets down to an icy 74 degrees in February, I'll be practiced enough not to be falling off. SEEYA Jack
Very nice. What did you use for the graphics?
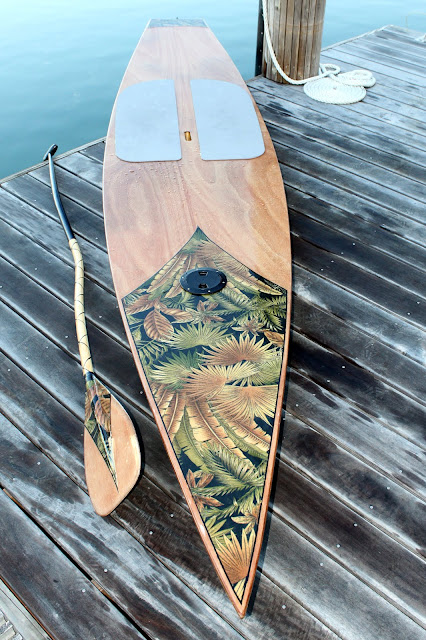
Dave, I used some Tommy Bahama cotton fabric I found at a design center. Try to use cotton or a cotton blend and wash the sizing out of whatever you use. Saturate the wood with epoxy before applying the cloth because the wood will want to starve the cloth of epoxy if you just roll it on cloth over dry wood. SEEYA Jack
Jack,
Great looking board! Any chance we'll be seeing it at OkoumeFest this May?
George K
I'm bringing my swing keel dory but the Kaholo will come too. SEEYA Jack
Great design and execution on the fabric. How do u prevent the fabric from fading over time?
Thx
Michael
Great looking board! By putting in that hatch cover to get away from having to use that breather tube? I am building one now and not very excited about the breather tube really. Lots of photos I see don't have any tubes in them so I am assuming these hatch covers are what people are using to replace them?
Michael, Thanks, I'm relying on the UV protection of the varnish to reduce fading along with the fact that the fabric is a "designer fabric" ie. one ment for use in indoor/outdoor applications.
Klaver, yes, the hatch is there in part as a breather. I built a box with 1/32" holes drilled in the sides under the hatch for storage and drilled a 1/32" hole in the hatch cover as well. Water shouldn't enter the hatch cover hole and if it did(a drop or two) it would be contained in the box. Remember that the breathing that the hull does is a product of differences in inside and outside hull temps. and is contenous. A closed hatch cover without a breather hole will not suffice. SEEYA Jack
Thanks for the info! If I did that same, at what stage in the process do you add in the hatch cover? Did you cut the hole out of the top peice before adhering it to the deck I assume?
I'd suggest that you not even cut the hole for the deck hatch untill you have the varnish on the deck. You'll find it easier to varnish if you don't have to work around the hatch. Over well dried varnish laya patch of blue tape, mark off the hole using the hatch as a template, then saw out the hole. Remove the tape and bed the hatch with clear silicone and it will be fine. SEEYA Jack
Jacknlin,
How do you refinish the deck if you have the deck lid in? Thanks
Michael
With 4 or 5 good coats of varnish on you won't be refinishing for a long time. consider the finish on a 5 year old car and that's just one coat of clear coat. When you do want to refinish you can pry the hatch rim off with a thin putty knife. That's why I suggest silicone instead of 5200. Any way, the Kaholo is so much fun that you won't want to take it out of service long enough to refinish. SEEYA Jack
Jack
Analyzing the photos and text about your board, I have another Q for you regarding the deck plate and underlying dry box. As I see it, a centered deck plate like yours (and others) is right over the center deck stringer. Did you 1) build the dry box around the center deck stringer so the stringer goes through the middle of the box and visible from the deck plate opening (and inconveniently gets in the way of accesing the box); or 2) did you cut the deck stringer and build the box between the two outside deck stringers and cut and attach the middle stringer to the front and rear of the box.
That make sense? If not, I can try to be clearer with some pictures.
Also, why a 1/32nd inch hole vs 1/8th inch hole which would match the hole specified by CLC? OTOH, I recognize the CLC design used gardening low pressure fittings which may have driven their design decisions. 1/32nd inch in the deck plate is pretty small and could easily get clogged with a grain of sand or other debris which would defeat the purpose of the hole in the deck plate.
I'm also not an aesthetic fan of the CLC breather deisgn but I've a lot of respect for Larry (the Kaholo designer) and know that he's looked at other designs and wonder why he thinks this one is potentially inferior. Hope I'm not asking too much. I'm just searching for good design decisions.
Thanks
Michael
Michael, I built the box just aft the stringer. The box is as deep as the hull is thick there and I drilled the breather hole near the top of the side of the box just 1/4" under the deck. The box would have to be almost full of water and under some pressure to go through that hole into the hull void. I see that as improbable. The hole size was arbitrary and I'm sure a 1/16" hole would suffice. Water on the deck plate would be under no pressure and theoretically run off before running in the hole. Any water that finds its way into the hole in the plate is contained in the box. I use this board most every day and no water has entered so far. Hope this helps. SEEYA Jack
Any pics of the box you put together for this? Was it simply some scrap ply wood? I assume to built that in at the same time as you put in the bulkheads?
Thanks for all the advice!
Firstly,in my response to Michael, I should have said just aft the rib or bulkhead, not the stringer. Stringers run fore and aft as we know. Secondly, no pix but its' just a four sided form, no top no bottom, beaded to the hull bottom and cut off even with the top of the ribs, so that when you glue on the deck you create a sealed box. It's sealed with the exception on the 1/32" (or 1/16") breather hole in the side of the box. When you butter the top of your ribs, stringers and rails, to glue on the deck, butter the top of the box as well. I build from plans so have a lot of spare wood but you can use any light material that you can seal with epoxy. Hope this helps. SEEYA Jack
Jack, thanks for the clarification on the ribs. I figured out that you meant ribs and not stringers. What confused me originally is that the drawings in the manual show the stringers going all the way to the bow but I've looked close and realized its just he drawing.
Can you tell us about the hand hold in the middle of the boat. I have one of those on my current board and find it essential to hold the board at an angle when going up and down the 40' of stairs from the cliffs above the ocean where I live In santa Cruz CA.
I'd also love to hear about the unusual paddle you have. Love it!!
Thx. Michael
Thanks for the info! I just installed the stiffener strips that drop into the bulkhead sections and it appears that I would have to put that hatch far more forward than you did or that box would be sitting right in the middle of one of those. Do you have stiffener strips in yours ....maybe that is a new addition to the current kits. Even so, no big deal moving it up a ways.
I made the hand hold in the same way I did the storage box. I marked where it would fall on the deck before I gluing on the deck then drilled a pilot hole in the deck and cut the area out with a flush cutting bit and rounded over the hand hold with a 1/8” round over bit. One caveat, I installed the hand hold aft the center rib and that’s too far aft. On my next board I’ll cut the rib in half and put the hand hold in the middle if the rib. It’s just far enough aft, as it is, that the board doesn’t balance quite right….. For the paddle I covered one side of 3MM plywood with carbon fiber for the blade. I split a length of 11/8” closet rod lengthwise then routed out 3’ on the flat sides with a ½” core box bit so the when put back together 3’ of the rod would be hollow. This was done to reduce weight. Use a thin kerf blade to rip the rod. I built a bending jig and steamed the rod pieces and glued them back together over the jig for the bend. I tapered the top end of the handle with a hand plane to 5/8” at the top and installed a knob. I cut a 6” slot on the working end of the handle to receive the blade after tapering that end to a point and glued on the blade. I wrapped two strands of carbon fiber around the shaft from the blade half way up for stiffness and finished the top half with epoxy with graphite powder. I like the paddle but I’m a novice paddler so I’ve lent it to a couple of racers who said it was about as good, but not quite as stiff as a commercial bent shaft full carbon paddle. I could stiffen it up with more strands of carbon fiber but it’s a better paddle now than I am a paddler so I‘m happy. It was fun to build and gets a lot of “that’s a cool paddle” comments. Hope this helps. SEEYA Jack
Klaver, Actually my hatch is just aft the second rib and the stringers end just forward of the third rib so no issue. SEEYA Jack