new project

am waiting for the glue on the last set of planks to dry so i thought i would share the latest project I am working on and my continued exploration of light, performance sea kayaks optimized for where and how  I like to paddle – creeks and rivers, generally flat to light chop and typically at a 65% pace with an occasional sprint to get the ticker going.

I have been operating under the thesis that if you make it easy to paddle, you paddle more.  And I continue to affirm that a shorter lighter boat is often the way to go as speed is optimized once you know the input (power).  So longer is not necessarily faster.  At a relaxed paddle pace, the shorter boat may be actually faster than a longer boat due to the trade off between form drag (how much water you displacing and rate) vs surface drag (the number of square feet in the water of skin and its effect)

The last boat in this experiment I built, was a modified petrel play that came in at 28 lbs.   It’s a tad under 14 feet loa and it’s been a real joy to paddle and easily gets the most use because it is simply easy to move around.   The boat was built with 3/16 paulownia throughout.   However, there were two disappointments with the boat.  First, it was supposed to come in at 25 lbs but after construction, I was concerned that the bottom flat sections were too flexible (not stiff enough)….so I added another layer of glass on the bottom to stiffen it up.  And glass and resin are heavy.  I also miscalculated the weights of fittings and their impact.   So while still very easy to manage….a bit of a let down on the weight.   The second disappointment was how quickly the short hull runs out of top speed if you want to really lean into it.   The boat is totally fine at 65% and easily keeps up with longer boats during a relaxed paddle, but you quickly feel it getting caught up in its own wave form if you push it.

My other experiment in light builds is a standard petrel with very close attention to detail in its build. On that boat I used 3/16 cedar and it came in at about 31 lbs and is definitely one of my favorite hulls in terms of handling and a reasonable turn in speed.

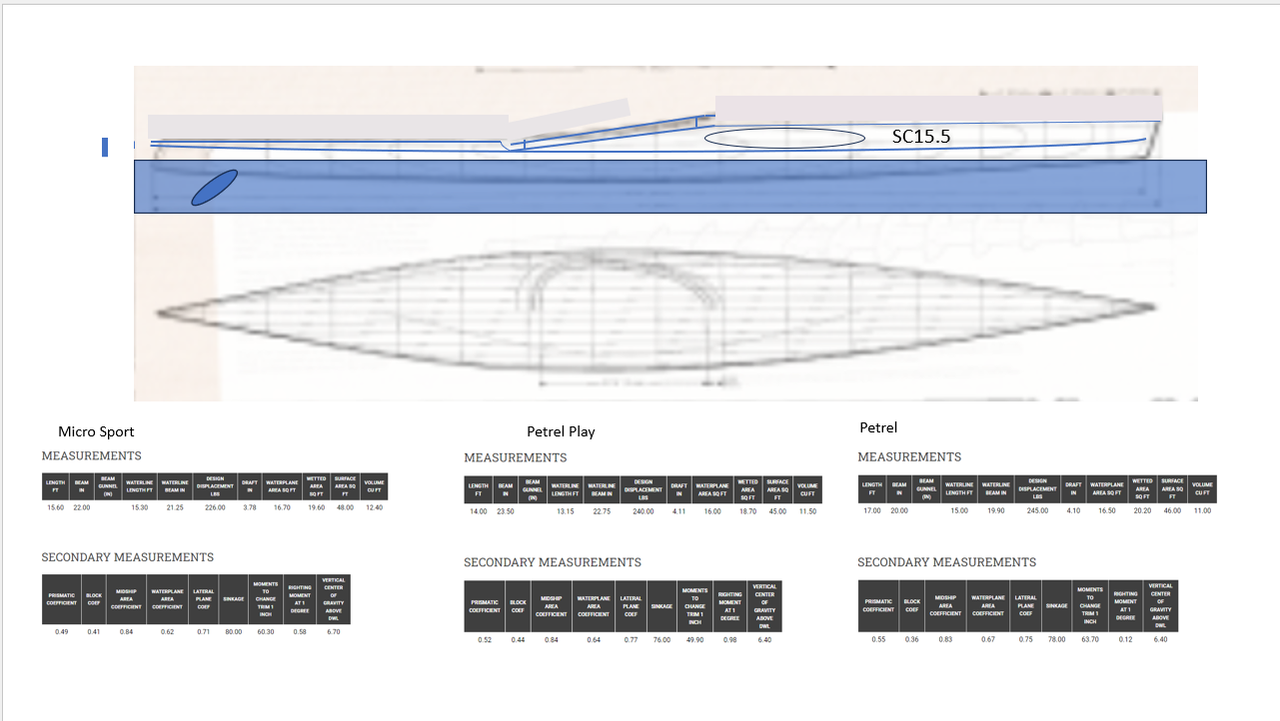
So the project  this year is a modified version of a microbootlegger sport which has a hull very similar to the petrel with respect to LWL  but about 1.5 feet shorter with a 15.5 LOA as it avoids the overhangs.

The target is 25  lbs and I hope  to achieve this through minimizing rigging and using a core design of ¼ inch paulownia in the flat sections of the bottom of the hull (so I do not have to add glass for stiffness) and 3/16 paulownia for the rest of the boat and by reducing the total square footage of hull (to about 44 square feet) by taking 1.5 inches off of the shear line which on this boat is straight pretty much vertical.  there are other cockpit modifications to use approaches i find convenient and easy like making the cockpit coaming proud and not flush which is sometimes tough on the fingers to get a skirt on.

All the paulownia was delivered in January and I am working now on the bottom of the hull.

Picture of the boat is below with the basic idea of what its cross section should look like with some of the comparison numbers vs the petrel play and petrel.   SC 15.5 stands for spa creek in annapolis which is my home paddling creek and 15.5 is the loa.


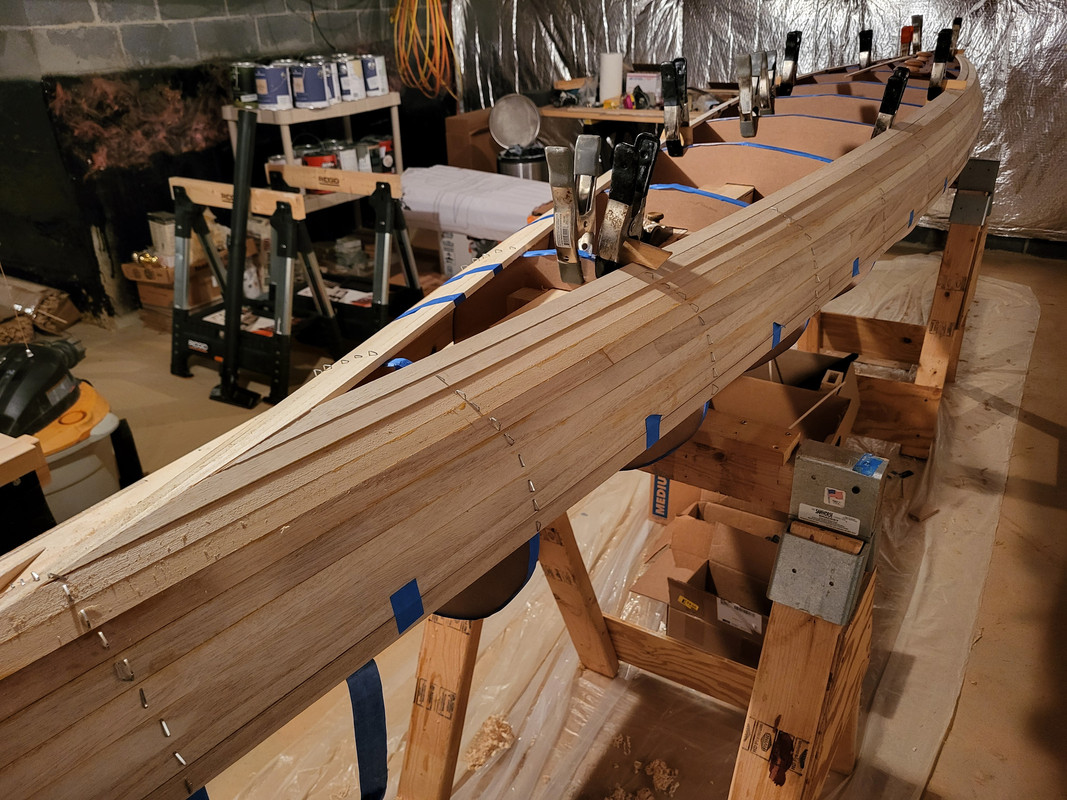
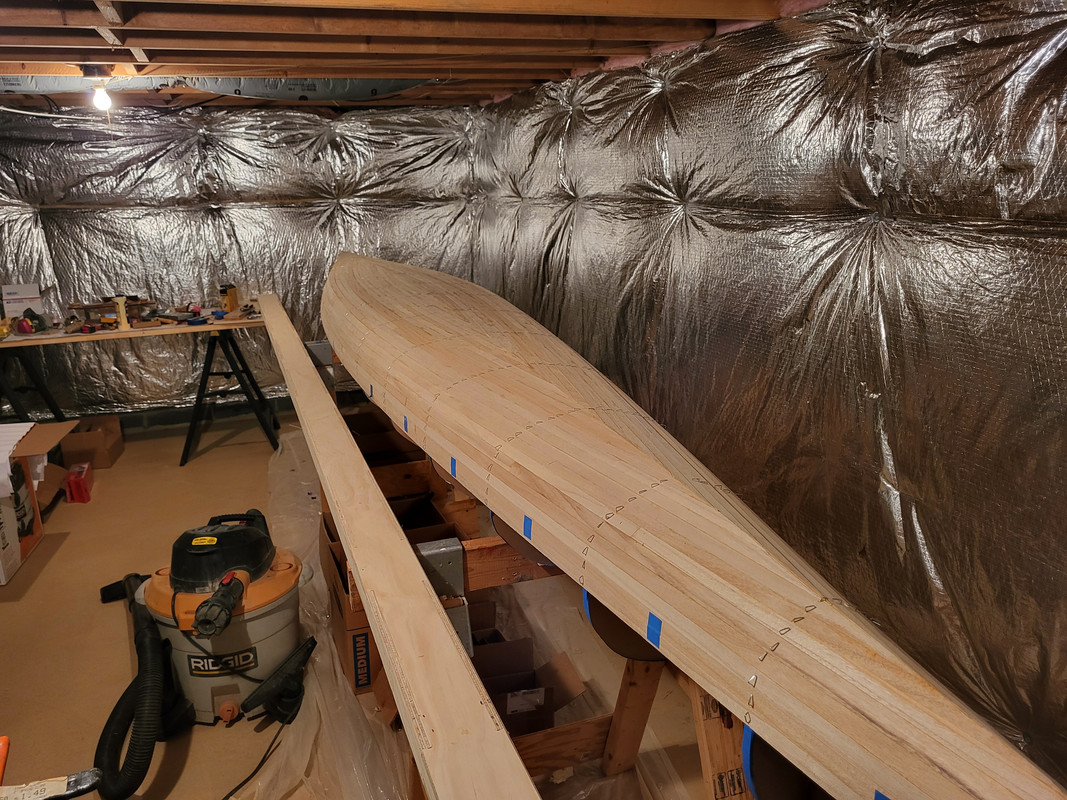
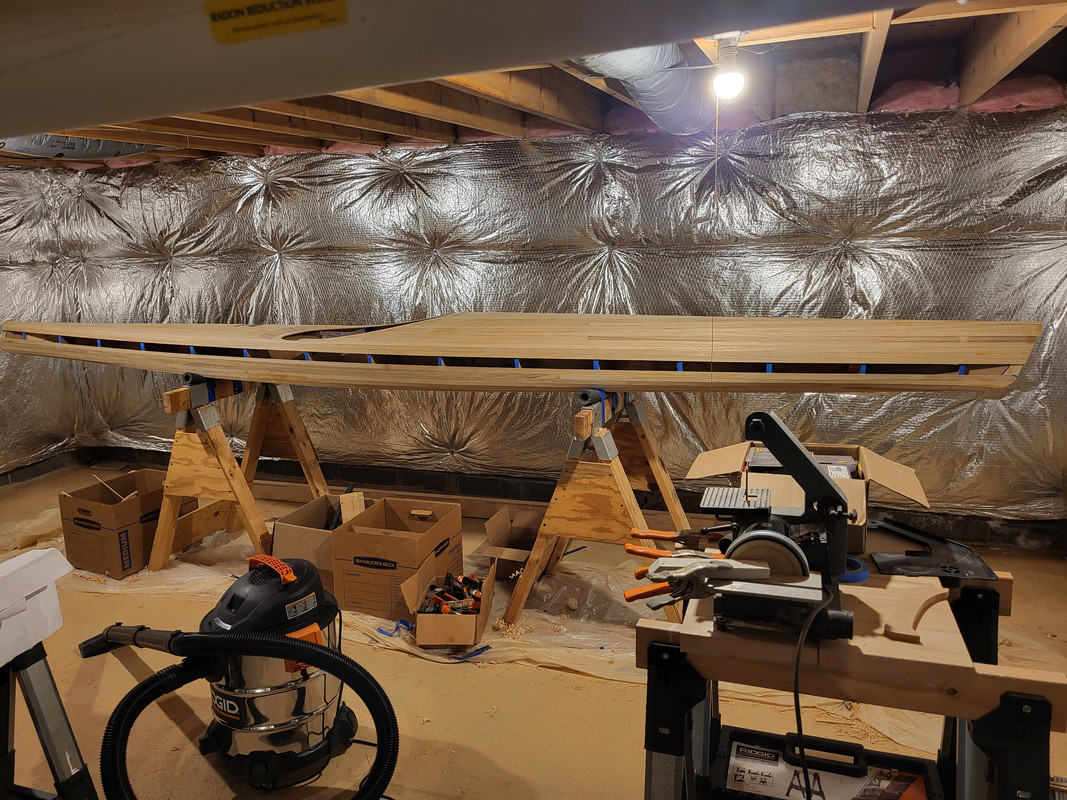
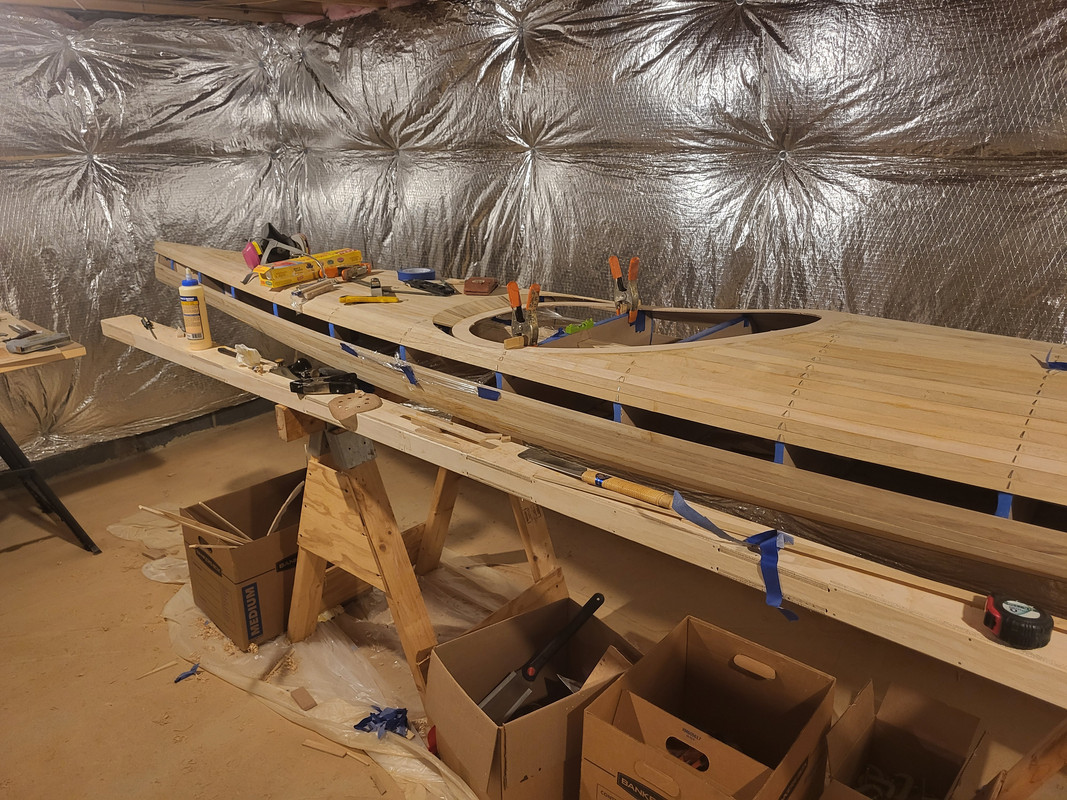
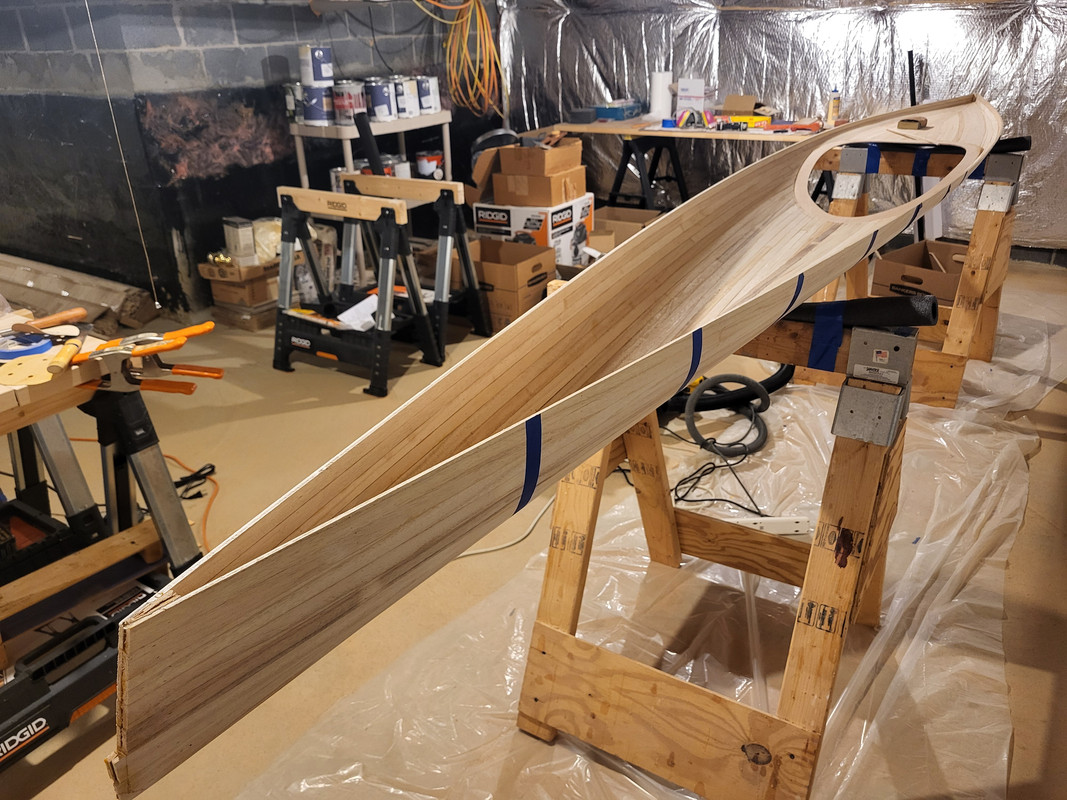
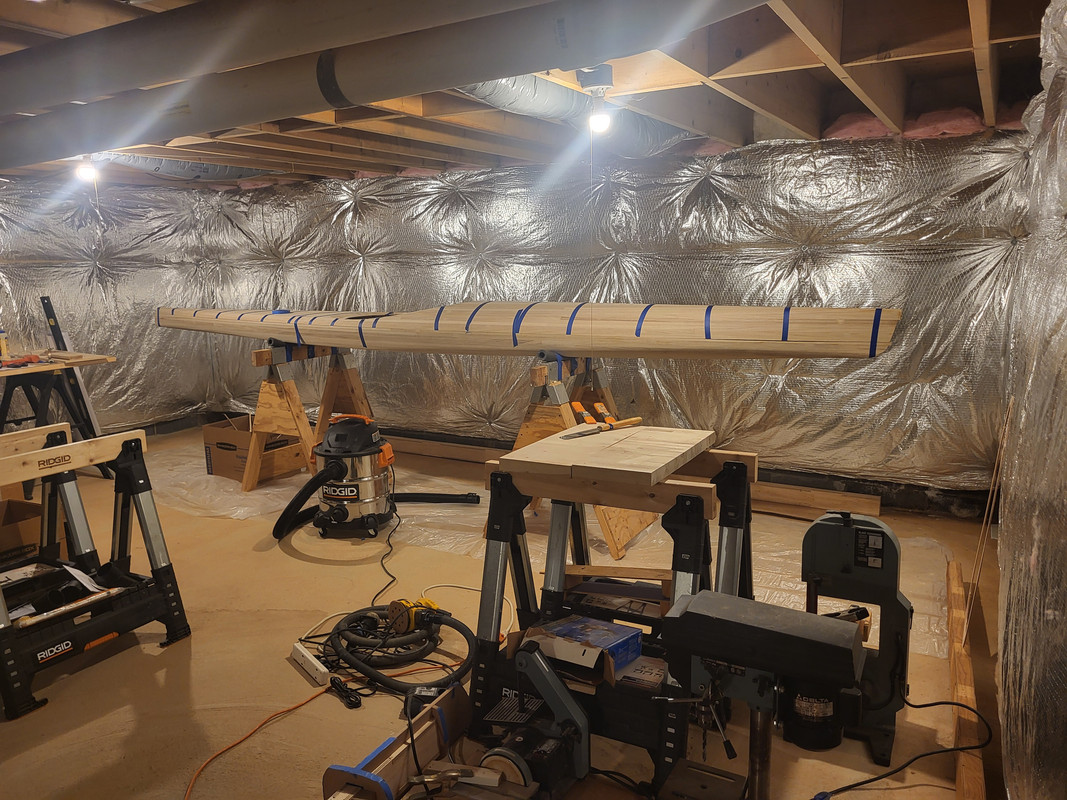
The following picture is the hull under construction and you can see some of the thicker paulownia coming into play after the turn in the bilge.

the only other comment worth noting is paulownia is a lot cheaper than cedar and very easy to work with.

Don’t think I am working fast enough to get it done by big little boat festival…..but should be in the water later in the season with any luck.

hope this was interesting.

h

1 Like

   i was away on holiday for a week of sailing and finally back to my micro-bootlegger sport project.

this evening finished stripping the bottom of the hull.  top picture is the hull and the next picture are the tools.

the strips, as mentioned before, are paulownia with rectangular sections so no cove and bead.   as usual the tool that got 75% of it done was the stanley low angle block plane.   the robo-bevel tool from nick shade got some good use as this particular hull form has a lot of nice, straight runs.   a new addition this year to the tool box is a vintage stanley #79 side rabbet plane that i picked up on e-bay and did a nice job doing the center line.  i had seen a video of nick using one and was hooked on it.  while not used a lot, if you have to do a center line, it makes it very easy ....and lastly, an exacto knife for some hard to get into places to take a shave off.  really not a lot of tools at the end....and combined with paulownia that is very easy to work with, was very pleased how easily the bottom of the hull stripped up.

next step is to flip it over and start on the deck....but a glass of whiskey  first - or half a glass....and we will start that after celebrating the little victory.

h

Excellent project Howard.  I look forward to seeing more.

I totally agree with your comments regarding speed of the Petrel Play.  It is a wonderfull hull, but at about 5mph it hits a brick wall.  For comparison, the Ch17LT is about 0.5mph faster and the Mystery is about 1.5 mph faster at full effort.


Howard,

Had you considered keeping the bottom 3/16" and adding stiffness with a layer of unidirectional carbon fiber?

Second, where are you launching in Spa Creek? Is Truxton Park safe for kayaks again?

Laszlo


 Thanks Mark,

Yes brick wall is a great description.  When we  are paddling along with a group and we need to take it up a couple notches, the folks in standard 17 foot sea kayaks just march away.   It’s a very sudden onset of resistance on the petrel play hull which for most of the rec paddling  (65%) is only moving at about 4 mph….as is everybody else.

I do also want to discuss for folks a little bit more of using dual core 3/16 and ¼ inch and why that is important on this boat as well as some other bits to get to the tageted weight of 25 lbs.

One of the things that makes a petrel or petrel play hull sublime in its handling qualities is the blended hull form.   It is rounded on the bottom fore and aft of the cockpit (e.g., rounded bilges).   But there is approximately a 3 to 4 foot area under your butt and extending aft that is hard-chined and the floor is flat absent a slight v in cross-sectional shape.   This hull form, if you haven’t experienced it gives an amazing combination of properties i value and is also very efficient.  It  can turn easily, go straight easily, respond to leaning and is a great blend of performance and stability.   Romany's, which are renowned for their paddling properties use a similar hull form.

With respect to construction and stiffness, where the hull is rounded, it is self bracing similar to rolling up a piece of paper into a tube.  Without being rolled up, paper flops around, rolled up into a tube it becomes stiff and rigid.

So for the curved sections of the hull, the hull layup recipe  (the combination of glass and core  (e.g., the wood) and epoxy)  can be less less stiff (stiffness measuremennts for various hull layup recipes are always measured on flat plates) yet perform stiffer because it is curved.

For the flat sections, you don’t get the curve/self reinforcing effect so you simply have to have a stiffer recipe.   From a recipe perspective, a thicker core (vs adding more glass and resin) dramatically increases stiffness. So a ¼ inch core is almost twice as stiff as 3/16 inch core with the same skins (epoxy and glass).   The key thing in this build is I will only go with the stiffer recipe on the flat sections so my increase in weight is limited to less than10 square feet.

Each recipe has a predicted ounces per square foot (weight of resin, glass and core for a 1 square foot plate).     So paying attention to total square feet of hull is important too.   And  bigger boats have more skin.   So if you have two boats of the same length but one has high sides vs the same design with less freeboard, you can also accrue the weight savings of less square feet of hull.  So the other element of the modification to the project is reducing the boats  freedboard by 1.5 inches resulting in reducing the square feet of the boat skin by 4 square feet or 10% compared to its baseline.    

Finally paulownia is about 18 lbs per cubic foot vs 20 lbs per cubic foot for western red cedar….or about 10% lighter.

Take all of the factors above and the ‘recipe’ book, the boat calculates out to about 23.5 lbs before the rigging, seat, and misc fitting.

I also want to acknowledge Laszlo’s question on carbon fibre and keeping the bottom 3/16, and spa creek.

I have looked at carbon fibre (e.g., change the recipe to have skins with less stetch (i.e. more tensile strength) and like everything, in addition to the physics and the recipes, there is something I call workability – can I duplicate the lab results in the real world with the tools I have. 

The challenge I have had with carbon fibre (and i have a couple square yards that i have played with) is most of the layups I have researched and their predicted weight and stiffness are based on applying some kind of vacume bagging technology with the carbon fibre to minimize the resin (and resin weight).  

In my personal experience with carbon fibre, and as somebody who does not have nor wants to have vacume bagging technology given all the extra stuff involved) I can’t get the weight performance on the hull because I can’t easily control the resin through the remaining means I have available.   

I do use carbon fibre for my fins and skegs and small parts,  but on these bits, I can typically pull saran wrap over the piece to compact the resin/fibre onto the pieces to keep the resin weight low or the piece is so small the extra expoxy doesn’t amount to anything significant.      

I guess what I am saying is I am more comfortable, given my skills and tooling, that for a hull build that I will get the expected results of stiffness and weight targets with a thicker core than with carbon fibre.  

The other change I have in my builds is I build with S glass (vs E-glass) which is between e glass and carbon fibre in terms of tensile strength but has the working properties of e-glass which I can easily control.


On spa creek, I see folks launching from truxton park all the time.  They have the signs up saying its dangerous or something like that due to electricity in the water.  I don’t get it.   They certainly are not stopping anybody which I expect they would if it was really dangerous.    I launch from a dock a hundred yards away from it but routinely paddle there.   Call me and happy to meet you over there for a paddle.

h

just thought i would provide another update....on this slow moving project.

i recently completed stripping the deck...so i can get ready to start sanding after i clean up the shop a bit after the stripping step.

as you can see if you read the thread, i flattened the back of the deck relative to a regular micro bootlegger sport and i also changed the coaming to only have if sunken in the aft section.   i have also removed the two strips that will 'lower' the profile of the boat by ~ 1.5 inches to make it more lithe, lighter and less 'chunky' looking.  based on measurements, i may reinsert a 1/4 decorative strip....  but so far so good.

the next picture is just some detail on the sill and how we approached it.

i wish i was moving faster but just not happening so expect it to hit the water towards end of season and then show it at next year BLBF.

h

its a hot summer with a lot of evening paddling going on which has slowed my progress on my micro-bootlegger sport with a modified low deck and focus on light weight.

i am pretty much done sanding and scraping the inside and outside and am going to be getting ready for glassing.

unlike past projects, i expect to fully glass the inside and assemble the boat prior to glassing the outside in order to allow me to try out some interesting grapics approach while keeping it all super light.  so far, the structure you see in the picutres is ~ 14.6 lbs which is about 3 oz heavier than the weight i calculated in advance for this.    

the attention to detail on the sanding it important to hitting the weight target as any strip that is not fare/flush with adjoing strips is an opportunity for pooling of epoxy which needs to be very carefully managed to hit the weight target of sub 30 lbs.

that said, definitely expect to be complete before next BLBF :)

h

Howard,
Was looking for info on lightweight kayak builds and found this thread and a few others you posted. Being my first strip build I ended up going with CLC Petrel Play kit with forms and milled strips but had also acquired 20 bf of paulownia to incorporate into the project.

I have the setup to mill strips and currently have the paulownia milled to 1/4"x3/4" which matches the CLC provided strips. Then was going to plane all to 3/16 for the most weight saving, using mostly paulownia on the hull and a mix of paulownia and red cedar on the deck. After reading this I am thinking of going the way you did, with 1/4" paulownia on the hull flat bottom section, and 3/16" for the rest. Also the kit comes with 4 oz e-glass which is not as strong as the s-glass you are using which is a big consideration.
My question is, how to handle the transition from 1/4" to 3/16", and maintain the desired contour? Did you do a gradual blend/fair by eye?
Of course I could be overthinking this and its only 1/16" difference, but in my minds eye, its a huge step!
I also wonder what the weight difference would be if I used 1/4" paulownia for the whole hull and and slightly flared the deck where it mates the hull.
Time to dust off the calculator and cypher the weight numbers.

Anyway, your projects are inspiring and a great resource for noob builder

Hi Bill,

on the 3/16 to 1/4 inch transition, as a starter, the step/transition was on the outside of the hull, not the inside. so i basically stripped it up around unmodified forms so the inside was smooth.

in terms of faring it all in and making it look good, that was fairly easy at the 1/4 was only on the bottom of the hull…not the whole hull. so the transition occurred at what is referred to as ‘the turn of the bilge’ which on this boat is the strips where the chine occurs. so the bottom of the boat to the chine is 1/4 inch and the chine on up to the hull/deck part line (also called the sheer line) is 3/16. at this point of maximum curvature its very easy to blend the 3/16 to 1/4.

you could do the whole hull in 1/4 inch but i think it would be much more challenging to blend the different thicknesses as the shear line…you would have to remove a lot more materail to belnd it in and have it look fare.

hope this helps

h

Hi Bill,

Interesting this has come up now. I’m also considering a new build with thinner strips on the deck to save weight. As it happens Nick Schade has just released a new video where he has designed and built a new boat using 3/16 yellow cedar on the hull and 1/8 mahogony on the deck and he describes how he managed to get that to work. The article and video are on his blog:

Howard,
Really appreciate the response. So that makes sense, the inside is flush as it’s registered to the form and having the outside 1/4” to 3/16” transition at the “turn of the bilge” chine (just learning the boat building/design vernacular). I have watched the Nick Schade video series on his petrel play build many times and can picture his graphic of dealing with that transition.
That sounds like the plan then.
Thanks!

Peter,
I did see that video but only skimmed through it and didn’t register that detail, or did and forgot and thought I came up with idea myself. :grin:
Also only saw the video and not the blog so thanks for the link to that. Will revisit that on more detail
But i am at the point of maybe experiencing information overload as I’ve been studying the videos and books and forums endlessly and now it’s finally time to put hands on the wood.


hi everybody,
thought i would provide an update as i feel like i have the project moving again…
the pictures above are the hull test fitting to the deck and getting ready for hatches and sorting out rigging…which i will do in the next week if all goes per plan… then seaming, then bulkheads…then finishing.
the complete structure above with fully filled cloth on outside and wet out but weave on the inside is right at about 22 lbs…so on weight target per bill of materials plan…which has a target of 25 to 26 lbs…
i was going to try to do something fancy with the deck using boardlams but just got too busy and was concerned about some compexities that would have added so just went with my new ‘signature’ white pickled deck…which has the main benefit of being really cool in the sun and does not tend to overheat. it’s matched with an oxblood hull.
at this point…i feel like the end is in sight…this project just got terribly long with a lot of work distractions that pulled me away from building.
as i see i am getting close, the motivation to have it ready for BLBF…is building…so hope to see you all there.
one other things to note…the use of 1/4 inch thick strips for the bottom of the hull and 3/16 for everything else fixed the stiffness issue i had in the last build that required extra glass to address…so this is definetly a lighter way to do it.

h

Hi Howard

Nice to see you making progress, I must say the contrast between the hull and deck looks really good. I have a question as to how you modified the design to remove the 1 1/2 inches from the hull and change the rear deck. Did you just change the form patterns before you cut them, some form of CAD, hand sketches?
I also like the flat coaming, I do sometimes find it hard getting my spray deck secure on my petrel play with the recess at the rear.

Pete

Beautiful work. How did you pickle the deck? Skeg seems pretty far forward or is that my imagination. Did you make that too?

Hi Pete,
thanks for the comments. on your first question, the removl of the 1 1/2 inches in height was done by temporarily tacking the two strips (3/4) inche width at the seamline on the original forms. the microbootlegger design, if carefull analyzed, allows this to be done and the top and bottom still mate up. this does not work on every design…so no change of forms was required. the picture below shows that stage of the construction


on the coaming, this is where it gets interesting, and a lot of measuring goes on. if you take 1 1/2 inches in height out, you have to ask the question, will i have enough knee room? in the microbootlegger ‘stock’ design, the coaming is actually sunken all the way around…and i would not have fit. and as you point out (i have a petrel as well), the sunken sill/coaming can pinch your fingers and make getting your skirt on/off a pain. so to address the knee room i actually had to make the coaming sill forward section flush with the deck to gain some height back…and i made it sunken in the back but used my experience with the petrel to reduce the sink and angle to the coaming to make it more gradual so that my fingers would not get stuck. see this picture which shows that:

Hi David,
i came up with this to pickle the deck – the colorant is Mixol Universal Tints, White, #25, and i bought the 200 ml bottle (a bit expensive but cheap if you are doing more than one boat). simply mix it in a cup with denatured alcohol and it goes on like any alcohol based stain (but you have to agitate it a bit along the way to keep it in suspension). like any stain, more application, more white…less stain, more show through of the underlying wood.
after the stain, just glassed as normal. you do have to be careful in your work that sand-throughs on any stained surface are a bit more work to repair.
on the skeg, i think its a bit of an optical illusion of the camera becuase it seems the picture makes it look closer in than it is when i am in my workshop. its far enough back to do the job but not so far back that it would easily be exposed if you were moving through chop. i paddle a lot - two to three times a week spring, summer, fall…and have been doing this for 30+ years…so i am confident that i have it where i need it to be.
on the did i make it question, yes…its based on an approach i picked up from the former Superior Kayaks - now Nash boatworks. i do buy the hardware and control box from them…but i make my own skegs/skeg box becuase the one they offer won’t fit in my low-profile sterns…and carbon fibre looks cool…and they don’t offer that.
some pictures below:

It is a really neat look. The reason I was curious because many years ago we built a 1500 sq. Ft cabin whose interior was entirely pine (including the loft ceilings). The architect called for the walls and ceiling to be pickled - a task I decided to take on to cut costs. The suggested recipe was white oil-based primer diluted 25% with mineral spirits. It was a terrible, smelly and messy job that took me a couple of months of weekends but the end look after being varnished was really unique. You and NickS are in a class by yourselves when it comes to building amazing looking boats.

wanted to share latest picture as i am coming down the home stretch - today i carved the bow and stern outer stems…and stained them black…to see how they would look. i think it will be pretty slick and i have taped them into place temporarily…
as an inspiration, i think, however, that i may sand them down a bit and do them in black carbon fibre weave…which may make it cooler…


cut the hatches today…over the next several days will build out the underdeck structure…then will finally be able to join the top to the botton. will be going for a flush hatch installation that i am still trying to sort out…but will keep it moving.
the picture below is the hatch sill and spacer that i made up …will be sanding them into final shape and reinforcing with s-glass. these are exceptionally light in terms of the underlying material to keep the whole boat project very light…

fwiw, i struggled a lot on whether to have hatches or not…as i have seen builds without them and it would be lighter…but i was not comfortable having enclosed spaces that cannot be inspected to ensure that they are dry. in the 40 plus yeas i have of boating, i continue to be amazed about water/moisture’s ability to find its way into flotaion space. the ultimate enemy, in my view of any high end boat…is sitting water/not ensuring its put away dry. so its just part of the habit of maintaining these that when they get put down after paddling, hatches off and a finger swipe to ensure 100% dry…