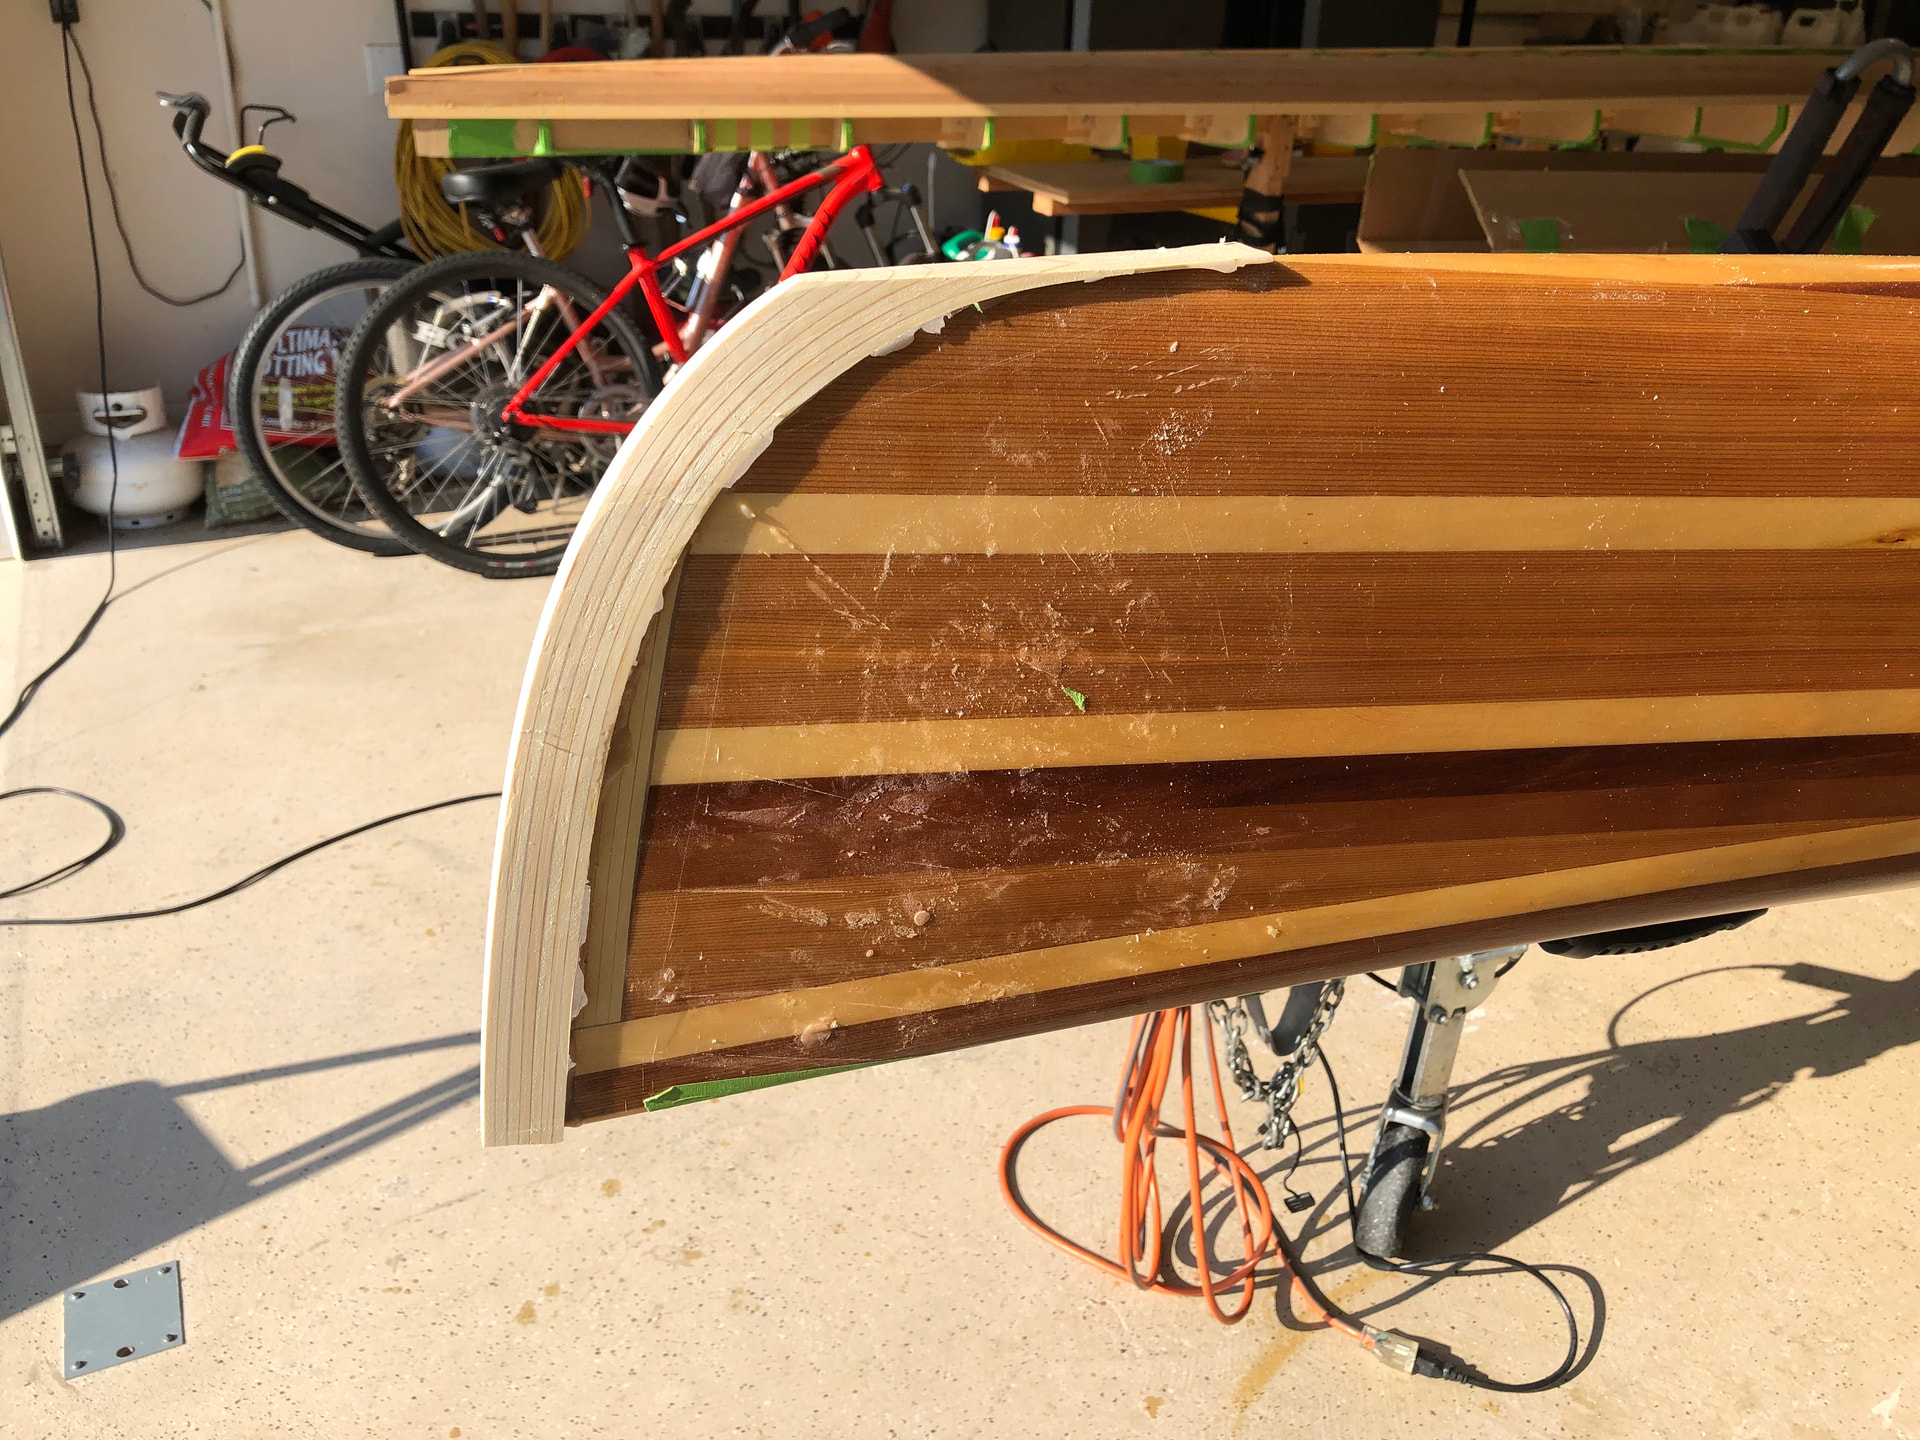
Well I would say this is the first major oops in my build! Do to the fact some of my strips hitting the keel near the stern will a bit proud, when I sanded they thinned out so much that some broke through! I already tried a glue/sawdust mixture and as expected that did not work. My options appear to be:
Extend the external stem another six inches. This might be tough to blend into the boat since there is minimal rise (or drop in this orientation) of the keel in that six inches.
Cut back the damaged area in the three strips effected and replace with strips matches as best I can.
Try an epoxy/sawdust patch.
I’m leaning to the second option but interested in the opinion of more experienced kayak builders and if there are other options I have not thought of! Option two or three would be done after I have taken the deck off the forms so I could work on the area from both sides.
i took a look at your pictures. first, this is looking really nice. and this is a minor setback at worst, a learning opportunity to build skills on the positive side.
option 2 is the way to go - your leaning is spot on. for whatever its worth, i don’t have a single stripper i have built that i didn’t end up cutting out an errant or damaged section of strip and replacing it.
some things that i have learned in that process:
celebrate the anger/disappointment (depending on how you do this, sometimes best out of earshot of family members) but let it pass before fixing. working while upset is not a recipe for good results.
when replacing adjacent pieces, don’t have them all stop at the same place, stagger them as if you were doing a repair to a wood floor and trying to match the vibe.
try to match the general color - as you have pointed out. but you were not working with full length strips anyways…so don’t over obsess on matching.
work slow (and i really mean slowly…no hurry here) and do one strip at a time. work by hand with a thin kerf hand saw and use blue tape to mark where you want to cut (i basically put the blue tape on the edge i don’t want to cut and then ensure i cut right along the edge of the tape. the key thing is not to take material off of the adjacent strip that is not coming out.
butt joints are fine. to make the ends, when you are cutting out, i drill a little hole for my saw blade that allows me to make the cross strip cut…and then i use a flat file to clean up the line (again work slowly becuase you dont want to cut into the strip you are not replacing). the flat file can also be used to clean up the longer cut along your blue tape line.
based on what i see here, you can have this cleaned up and back on track with two sessions…one session to cut out and replace…and a second section after your glue dries to refare it in.
below is a picture of a repair in my last boat where i had a strip that i damaged with a bit of carelessness with a handtool. i cut it out and put a new section in. it’s inside the red highlighted section where you see two small lengths…that otherwise would have been a single length.
What do you think of the idea of using a razor knife to make the cross cut instead of a drill, saw and file? Would that be cleaner, more accurate and need less post-processing? I’ve used that technique for land-based fine joinery, but never had occasion to try it on a strip repair so I don’t know if it’s applicable. It seems to me that the boat strips are thin and soft enough that they could be cut with a razor knife without undue effort. Am I full of it?
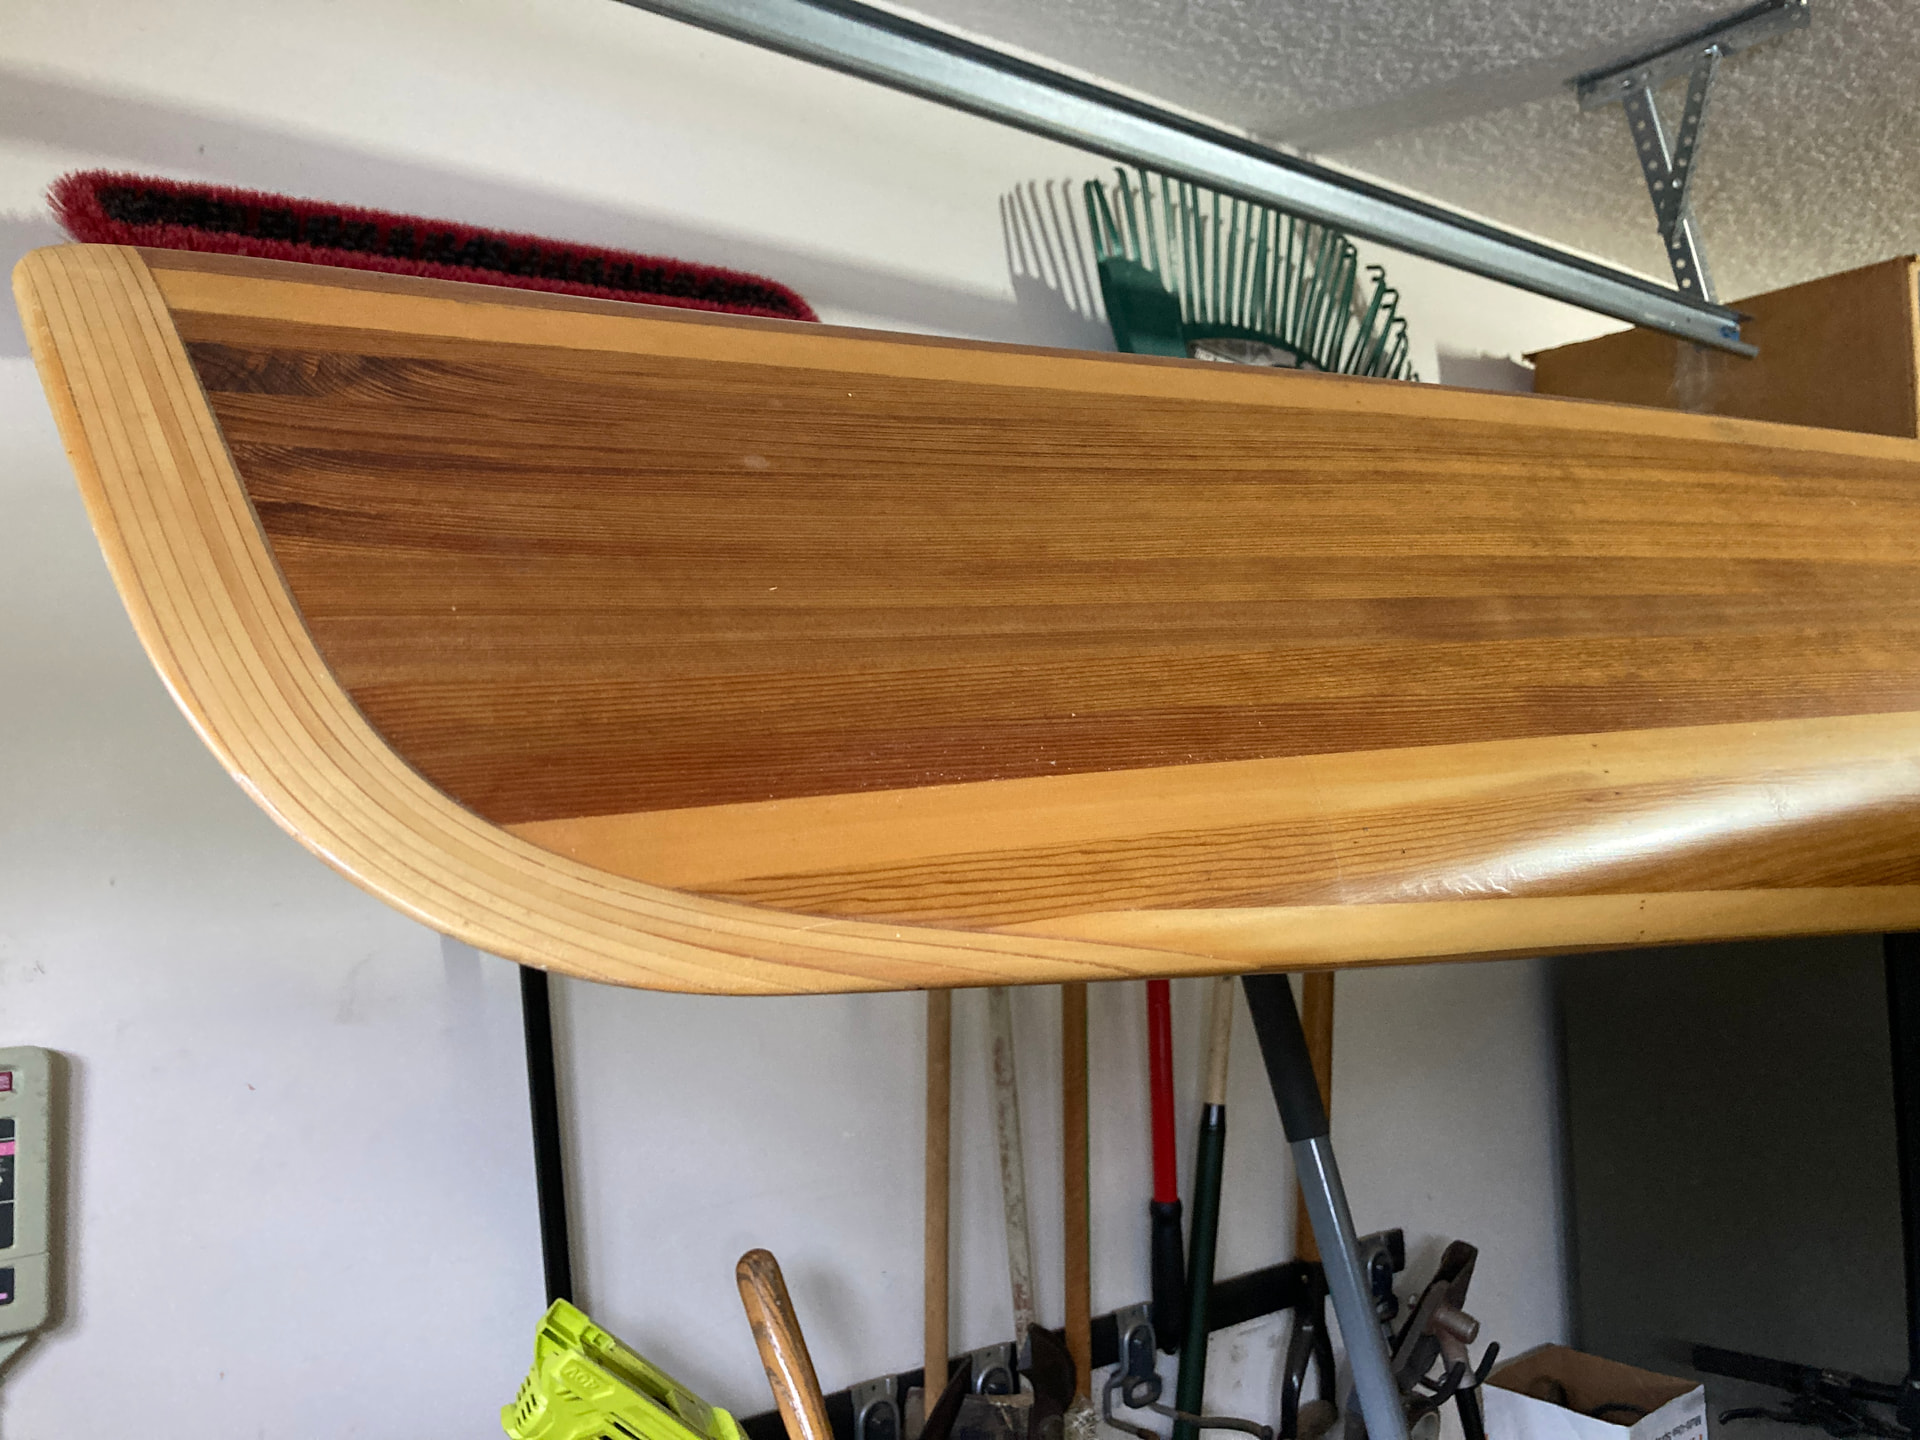
If it were my project, I would use a laminated outer stem. I have done this on three of my strip boats and it looks really nice. I used Alaskan Yellow Cedar strips for cosmetic reasons but WRC is much easier to bend into shape. I do this after the hull and deck are mated together. These pictures should give you an overview.
I am planning to put in a laminated outer stem. The issue is that, as I understand it, the stem should end at the keel line where it starts to flatten out. This permits you to blend the outer stem into the keel. The extra six inches of outer stem would be in an area that is basically flat so it would be a bit more difficult to blend.
I do have this option still available if after trying option two it still does not look right.
Actually thought of you when I saw the issue. I said, “Howard will say this is not a big deal!”
Like the small drill and coping saw idea. Was thinking of a razor blade, or one of those universal tools, but believe the saw will give me more control.
One question, I am using bead and cove strips. My hope is that I can gently coax each of the three effected strips out along with the bead. Am I better off just eschewing that idea and just cutting along the strip parting line, leaving the bead with the canoe and cutting the bead off of the repair strips?
Yes, you will want the stem to blend smoothly into the keel line. To make that happen, you will need to plane off hull material on the keel line then build it back up with the laminations. If you match the glue color to that of the wood, you will barely see where the stem ends and keel begins after shape it smooth.
Picture is the bow of my Spindrift. I had an issue much like yours so extended the stem back 12” from the bow.
lots of good ideas being shared. on your specific question about the fact that you built with cove and bead…
on cutting out the old strip, ignore that it is cove and bead and cut the line on the surface that your are trying to match. that said, when you fare it in, you cannot then sand signficantly relative to your current faring for the part of the boat that is not being replaced becuase the line will then move.
on the replacement strip, you will need to cut off the bead and glue a bead into the cove so that you have a rectangular section. (you could use the bead you cut off to glue into the cove if you cut it off with a saw)
Mark’s idea would work well too if you like the aesthetics of it. definitely one of the options i would look at…but i am comfortable replacing strips…
on lazlo’s idea of a razor knife, i would not have a problem with that idea if in my experience the razor cut effectively. for the razors i have had, i just have not had a lot of positive experience cutting strips with them. i have a lot of experience planing and whittling, but not this kind of cut. but if you can make it work and keep the cut clean/controlled, whatever tool works.
the key thing is its nothing that can’t be fixed…so that’s part of the fun of building…dealing with your dings and choosing between all the approaches on how to come at it.
by the way. the saw that i use for these kinds of repair is a little bonzai saw: Bonsai Saw – Chesapeake Light Craft and beading saw: Beading Saw with Woodpecker Tooth 6" – Chesapeake Light Craft. i use the bonzai saw often to start a cut from a very small hole and tight curves and use the beading saw for relatively straight runs and less severe curves. these two saws get a lot of use for my strip build projects.
I love the woodpecker and bonsai saws. If the wood is soft enough, the bonsai can be started by working an X-Acto knife blade through the wood. This makes a large enough slot to accept the tip of the bonsai saw. Here’s the process in use to cut a flush hatch through sapele plywood. The outline of the hatch was traced with the x-acto blade to score the wood and cut the top layer of fibers. In the third picture you can see just how fine the kerf line is with this technique. Using just the razor knife the final kerf is as thin as the score in the first image. Maybe this can be adapted to cutting the strips?
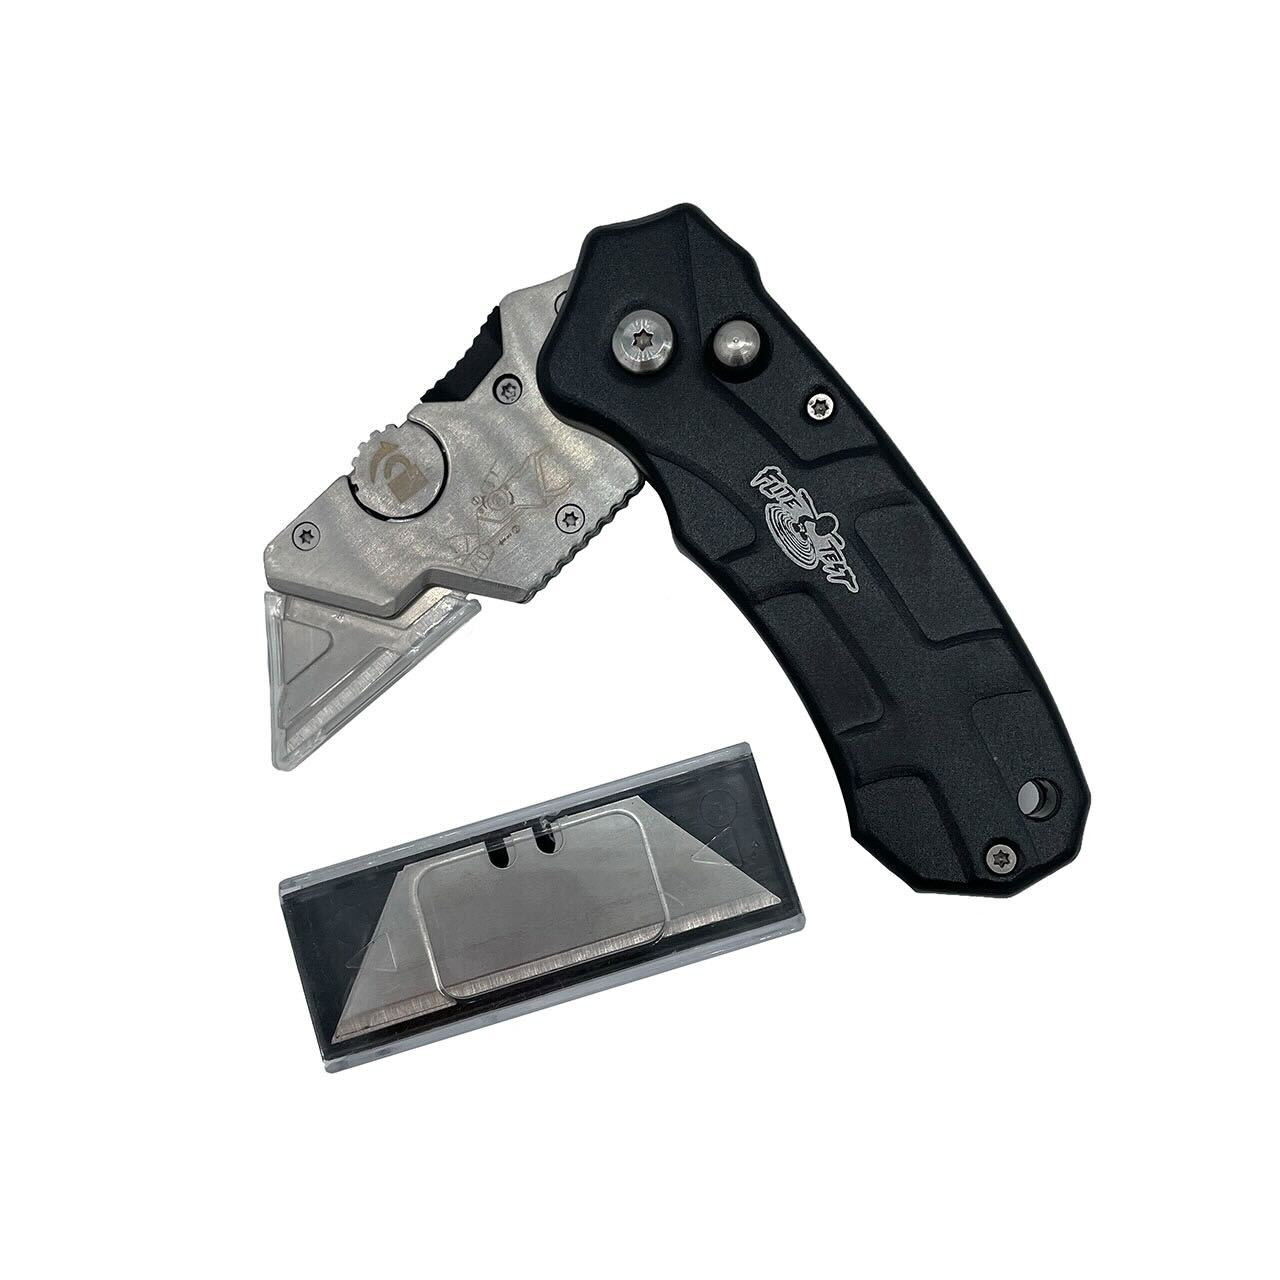
Howard, I know what you mean about controlling a razor. Bare razors are only good for paper, foam and other soft stuff. X-acto knives, with their round handles, will roll if you apply the kind of pressure needed for long cuts in wood and box cutters are the worst of all worlds. But there are good razor knife designs out there. Here’s my favorite razor knife. It has an ergonomic grip and a good weight that allows total control for both straight lines and curves. The blade folds away for storage. It can also be locked into one of 4 different positions to give you multiple cutting angles which is useful for beveling or working on a curved surface. I got mine from Flite Test to use on model RC airplanes, but it turned out to have great utility for general woodworking, especially fine joinery. If you don’t need the multi-position option, Husky makes a similar one with a slightly better feel which is available at Home Depot and such.
laszlo, thanks for sharing. thats pretty cool. my razor knife experience was limited to inexpensive box cutters… so this is pretty interesting. your pictures are really great for understanding. i may add this to the candidate list of my “one new tool for 2026”. Right now my top candidate tool is a an oscillating edge/belt spindle sander…
You fly RC Laszlo? We use the FT Baron for combat at my club. Two midair’s yesterday so some repairs to make. I can fix the one on the right because it was only one aileron. I will replace the one on the left because I lost part of the wing and tail.
I sure do, since the glowplug days of the 60’s, but no air combat yet. I’m 100% electric now. My hangar has a bunch of FT designs, some that I’ve designed myself and a couple of commercially-made models. I love the foamboard stuff. I can go the local framing store and get 40x60 inch sheets for under $10. As long as they don’t fly away a crash never costs more than about $5 since everything is usually reusable except for the prop. I’ve also recently started building 3D printed aircraft. Here’s some examples in my evolving basement workshop.
John Harris also does planes. These days he’s really into designing and flying small unpowered rubber band launched balsa gliders. Here’s a picture of his office at CLC from the recent factory tour video. There’s another larger aircraft collection out by the coffee maker and fridge.
I have only been doing it since Covid. Mostly I fly balsa planes built from kit. I am a big fan of those from Old School Model Works. My other thing is rocket powered RC gliders.
I figured I would give you all an update and of course a host of questions. I completed stripping and sanding to 100# on the hull and deck as well as putting in and cutting the recess.
Still might do a bit for final shaping of the hole I cut into the recess but I am reasonably satisfied with it.
If I go by Nick’s video’s the next step would be to start fiberglassing. Looking at his book, the next step is doing the coaming with the 2” strips. Also, I still need to deal with the area I broke through which will require me taking the deck off and putting the strongback back onto my original support so I can get to the hull. I can fiberglass it at that time as well. Combine all this with the fact that I am in an insulated but unheated garage attached to the house I probably can’t start fiberglassing just now. My questions are:
Does it matter if I do the coaming before fiberglassing? This would give me something more to do as I wait for the temperature to go up.
What was the lowest temp you can reasonably fiberglass?
When I take the deck off the forms do I have to make certain that I at least epoxy it to help it maintain it’s shape as I play around with the broken strips in the hull and fiberglass the hull. I neglected to glue in those blocks Nick showed that helped maintain the configuration when the staples were pulled. I noticed some separation between the deck and hulI which I could eliminate with simple tape so it’s not too bad
Is the temperature to just do the epoxy safely less than if I did the actual fiberglassing?
wow lou, this is looking great. on your questions:
coaming - on my strip builds i do the coaming after glassing the deck because its very challenging to glass the deck smoothly around the cockpit area with the risers in place i get wanting to keep it moving. you can certainly start cutting all the 2 inch pieces
i have built in an unheated garage and it just sucks some time. i had always tried to time it so all i had was wood glue activity during the cold season…my personal perspective, is if you can’t maintain 65 degrees, its not worth it. now i have, in the past, and people have described it in other posts, had the garage cold, but preheated the epoxy and then pushed the temperature up with an electronic heater, for the epoxy work…and then let it draw down to 65 degrees under a plastic tent…and have had good results with that. for me, the epoxy, by way of preheat, was always kept inside at ~ 70 or more degrees.
can it be done colder - yes. its just more risky/tricky in my view. again, these are my personal preferences and the range is broader then i describe…its just what i am comfortable with after a lot of boats and some hard lessons learned (lots of swearing and crying)
when you take the deck off the forms, it can be pretty fragile. so i typically glass the outside first but in some builds i did remove the unglassed hull/deck from the forms…you just need to be very careful. my perspective on your repair is you can do the repair without removing the hull from the forms. when i have done similar repairs, the boat was on the forms. so not sure if i am missing something here…is there a reason you think you need to take it off the forms to replace the strips that you sanded through?
not sure i understand the question…but i suppose if i was doing epoxy only work where no glass was involved, yes, i would probably assess that doing that lower then my normal preferred working temperature is safer then if glass was involved. but it all depends on the bigger picture and what i am looking to accomplish with the epoxy work and the impact of the cold on things like strength and application ease.
i do want to highlight that for good glass jobs, you generally want decreasing temperatures…so i like to do glassing in early spring when i can heat up the garage temporarily with that electronic heater then when done…let the temp come down. 75 is a good temp for me with the slow hardener cause it gives a good working time…but is warm enough to get a good cure. i just don’t like letting it drop to below 65 becuase of how much longer things take when you explore the lower limit of the temperature range.
have you experimented with a little electric space heater to see what you can do? fwiw, i find having a pair of air thermometers and a little electric heater to make temperature adjustments a must have tool for folks who want to do consistent good epoxy work.
other things i have done to keep busy when working around cold spells:
build my bulkheads
build my skeg
start to plan the rigging
sort out how you are going to handle the seat and potentially start that (will you be putting cheek plates in or buying a redfin seat that is precarved and does not require cheek plates?)
sort out how you are going to build the coaming (vs the risers which are all those 2 inch pieces)…and perhaps there are pieces i can pre-cut.
Question 3 - Initially I thought it would be easier to do the repair if I can get to either side of the hull, requiring me to take the deck off. As you stated, it would be better to have glassed the deck first which I can’t do until the temps get up, consequently I will attempt the repair with the existing configuration where both the hull and deck are on the form. To assuage my concern about dropping the last strip into the kayak cavity when trying to install it, I might superglue and easily detachable “handle” first.
Question 4 - In Nick’s book he mentioned first epoxying the wood surface before attempting to put on the cloth. He said this gave the wood some strength and resulted in less epoxy seeping into the wood when you do install the cloth. Did you ever try that?
During the winter I have been working with one space heater. When it’s 25 degrees out, it seemed to only be raising the temp a few degrees. Two space heaters were too much for the 20 amp circuit.
As pictured I have the kayak on foam pads. I assume when I am doing the fiberglassing I bring back my original stands, separate the halves, put the whole on the old stands, fiberglass the hull, take it off, flip the forms, then fiberglass the deck. Is this correct? Doing this, I will have either the hull or deck (depending on what I do second) off to the side off the forms. Is this a problem? This is why I was thinking of giving the deck a layer of epoxy before taking it off the forms.
Please let me know if my fiberglass thoughts are correct.
on Question 3, every repair is a bit different. i like your idea of a little handle. i have done the same just using wood glue…but a little superglue handle will work too. there is a possibility, if you are careful, and in concert with the next question, that you could, if careful, remove the deck which would allow you to have some access to the inside. access to the inside without the deck may still be limited due to position of strongback and forms relative to the repair area.
Question 4: yes, i routinely epoxy the wood prior to glassing. and this will definitely improve strength… but without glass its still fragile. sometimes this is called a ‘skim coat’ and it can preseal the pores of the wood so that when you do you final glass, you use less epoxy and don’t have to worry about ‘dry glass’ becuase the wood pulled the epoxy away from the glass after you thought you were done. it can also immunize you from out-gassing. i would say that if you are going to do that well in advance of glassing, don’t oversand your wood…to keep a rough surface. you do not want to apply so much epoxy that you have a shean/puddle where you cannot see the grain. another way to add strength if you need to move stuff around prior to glassing is with blue tape. the weakest item is a deck with the cockpit hole already cut out.
with respect to your last question about glassing (take deck off carefully, and put aside and glass hull…). your proposal works and i have generally done it that way.
every build is a bit different but in my last build i faced a similar problem. and used the blue tape i mentioned to add stregth before moving. in this particular case i did not epoxy the outside (because i was staining all the surfaces which changes the order of certain activities) but otherwise i would have applied a skim coat prior to moving.